GitHub Copilot CLI for Beginners: Learn how to use slash commands to control your terminal AI agent. The post GitHub Copilot CLI for Beginners: Overview of common slash commands appeared first on The GitHub Blog.
Welcome back to GitHub Copilot CLI for Beginners! In this series (available in video and blog format), we’ll give you everything you need to get started using GitHub Copilot CLI. So far in this series, we’ve covered how to get started and when to use interactive and non-interactive modes. In this edition, we’ll learn what slash commands are, why they matter, and how to use slash commands to control GitHub Copilot efficiently. You can complete tasks like switching models, checking token usage, and resuming past sessions right from your terminal.
Let’s dive in!
Understanding slash commands in GitHub Copilot CLI
When working in Copilot CLI, one of the most powerful concepts to learn early on is slash commands. Slash commands are built-in controls that you can access directly from the command line. Acting as your control surface within Copilot CLI, slash commands allow you to:
Guide Copilot’s behavior
Inspect changes
Manage context
Move efficiently across sessions and projects
Keep permissions tidy
Slash commands can be thought of as your command center for interacting with Copilot CLI. To look at all of the options available, just type / in the command line for a scrollable list of all currently supported slash commands.
Let’s take a look at some of the most popular ones.
Choosing the right model
Different models are optimized for different kinds of work. If you want to switch models, type /model into the command line. This will display a list of available models, along with key details like:
Capabilities: Some are better for quick, lightweight tasks like refactoring, while others more efficiently handle deeper reasoning such as feature planning.
Availability: The list may vary depending on your plan or organization’s settings.
Cost: Numbers shown on the right of each model indicate cost multiplier, helping you choose the right balance between performance and usage in relation to your plan.
Choosing the right model can significantly impact both speed and results.
Managing context and token usage
Copilot CLI operates within a context window, which determines how much information it can “remember” during a session. If you want to check your current usage, type /context to learn how many tokens you have left, along with system usage and available buffer.
If you find that you’re running low on space, you can free up space by typing /compact in the command line. This summarizes your current conversation so you can continue without having to start a new session. Copilot CLI will do this automatically when you approach the limit, but you can also do this manually if you want to transition to a new task or clean up context mid-session.
If you’d rather start fresh and completely reset your environment, you can use /clear to clear the session entirely.
Working across sessions
If you want to resume a previous session, you can type /resume. This will bring up a list of previous sessions you’ve had, including both local and remote sessions. Entering a previous session will show you your session history, and you can pick up right where you left off.
Inspecting changes
As you work with Copilot to make changes to your project, it’s important to keep track of what’s changed. If you want to see what the changes are, run /diff to see recent updates. This gives you a clear view of what modifications were made during your session, so you can validate changes before moving forward.
Navigating projects and directories
If you want to work across repositories or directories, you don’t have to exit Copilot. You can type /cwd to change your working directory to another repository. This allows you to scope Copilot’s work to a specific part of your project and helps you stay efficient while multitasking across codebases.
Managing tool permissions
In the past, you might have granted Copilot CLI permission to perform actions like editing files. Say you’re switching to a repository you want to be more careful in and want to reset those permissions: you can do so by running /reset-allowed-tools.
Take this with you
Using these slash commands gives you even better control over Copilot CLI—and the more familiar you become with them, the more deliberate your workflow becomes.
Whether you’re switching models, managing context, or navigating across projects, using slash commands in CLI gives you the tools you need to stay in control. And if you haven’t already: open up your terminal, type /, and explore! There are many more slash commands to discover.
Better orchestration, fewer handoffs, faster progress, without a single new knob. The post How we made GitHub Copilot CLI more selective about delegation appeared first on The GitHub Blog.
In agentic systems, more delegation isn’t always better. Imagine asking Copilot CLI to make a simple change. Instead of handling it directly, it spins up a helper agent that searches the repository, waits on a result, and stalls. Work that should have taken one step now takes three. While some tasks genuinely benefit from a specialist subagent—like exploring an unfamiliar repository, checking an independent area of the code, or running a long command while the main agent keeps moving—delegation isn’t free. Every handoff adds coordination overhead, tool calls, and wait time. If an agent delegates too eagerly, the “help” can become friction.
We recently released an improvement to our agentic harness called smarter subagent delegation. This makes Copilot CLI more selective by helping the main agent:
Stay focused when it can move faster on its own.
Delegate when a specialist creates real leverage.
Parallelize work when tasks are truly independent.
Smarter subagent delegation has now rolled out to 100% of Copilot CLI production traffic. If you want to get started today, simply update GitHub Copilot CLI by running the /update command in your terminal to version 1.0.42 or later.
In a production A/B test, this improvement reduced tool failures per session by 23%, including a 27% reduction in search tool failures and an 18% reduction in edit tool failures. It also improved total user wait time by 5% at P95 and 3% at P75, with no quality regression. Here, P95 captures wait time near the slowest 5% of sessions, while P75 reflects wait time toward the slower end of typical sessions. This means fewer unnecessary handoffs, fewer repeated searches, fewer failure-prone tool paths, and less waiting during long-running coding tasks.
In this post, we’ll walk through how we identified unnecessary delegation in Copilot CLI, what we changed to make delegation more selective, and how we validated those changes through offline evaluation and production A/B testing. We’ll also show why those changes led to fewer failures and less waiting—and what that looks like for developers using Copilot CLI day to day.
The problem: Delegation is powerful, but not free
Subagents are one of the most important capabilities in an agentic CLI. They let Copilot break down complex work, run investigations in parallel, and keep the main agent focused on coordinating the final answer. For large codebases and multi-step engineering tasks, that can be the difference between a slow linear workflow and an efficient parallel one.
But delegation introduces its own failure modes:
Unnecessary handoffs for simple tasks that the main agent could complete faster on its own.
Overuse of exploration subagents when the handoff already contains enough context.
Repeated or overlapping searches across the main agent and subagents.
Sequential delegation, where the main agent waits for a subagent instead of treating delegation as an opportunity for parallel work.
Failure-prone subagent paths, including stale file paths, moved files, incorrect relative paths, and workspace mismatches.
Figure 1. Example: tool call failure by subagents while main agent is idling.
Our goal: help developers use subagents when they create leverage, avoid them when they add overhead, and parallelize work when the task genuinely benefits from independent execution.
From problem signals to shipped improvement
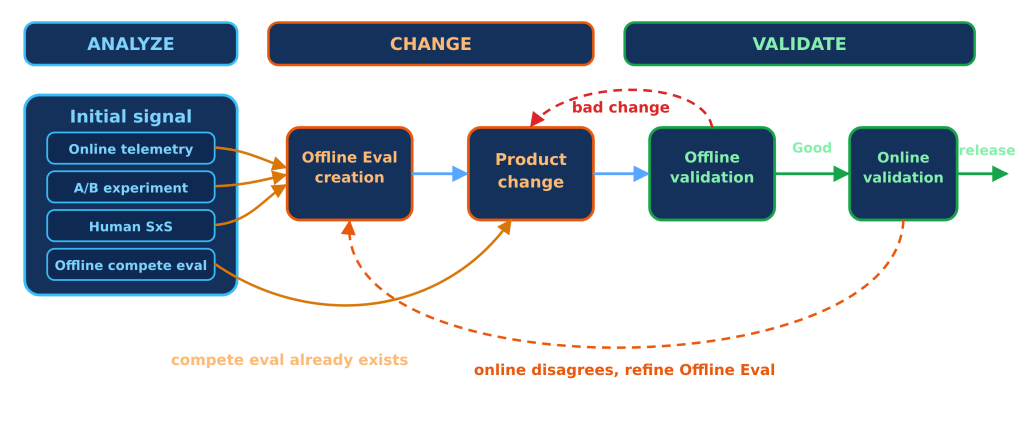
The way we identified the problem became the way we solved it. Instead of treating agent trajectory analysis, product changes, evaluation, and rollout as separate activities, we used them as one feedback loop: observe the agent behavior, isolate the orchestration bottleneck, make a targeted change, validate it offline, measure it online, and ship only once the end-to-end workflow improved.
Figure 2. The end-to-end improvement loop: analyze, change, validate, and ship.
1. Analyze: Let LLMs identify the delegation bottleneck
Instead of manually reviewing agent sessions, we used LLMs to analyze full trajectories and identify where orchestration was helping versus where it was adding overhead. That analysis surfaced a consistent pattern: subagents were sometimes being invoked for tasks that were already narrow, obvious, or fully described in the handoff.
In those cases, the subagent could spend time re-searching the repository even though the main agent already had enough context to act directly. That clarified the improvement target: keep simple discovery-and-edit tasks in the main agent, and reserve subagents for work that is broader, cross-cutting, or naturally parallelizable.
2. Change: Refine the orchestration policy
After identifying the bottleneck, we used LLMs to help translate that diagnosis into a more selective orchestration policy.
Copilot CLI should handle focused work directly: find a file, read it, make a targeted change, and verify it. Delegation is more useful when the work requires independent context, broad exploration, or parallel execution.
In practice, that means starting with the narrowest effective path, escalating when complexity or uncertainty creates value, and stepping back down when the task becomes focused again. Subagents should be treated as a parallelism tool, not a pause button. When Copilot launches a subagent, the main agent should continue making progress on independent work rather than simply waiting for the result.
When a subagent is used, the handoff should also be specific: what the user asked, what is already known, what the subagent owns, and what kind of result the main agent needs back.
3. Validate: Test offline, confirm online, then ship
Before broad rollout, we validated the change with automatically generated regression cases and existing benchmarks. This helped confirm that the new delegation guidance reduced avoidable overhead without breaking cases where subagents genuinely add value.
Finally, we moved through staff and public A/B testing, then analyzed production metrics across reliability, responsiveness, subagent workload, and quality. The gains did not come primarily from making individual LLM calls faster. Instead, it reduced orchestration overhead by avoiding unnecessary subagent paths and lowering subagent workload per user.
That end-to-end process let us move from problem signal to shipped improvement while keeping the user experience stable: fewer avoidable handoffs, fewer failure-prone tool paths, and no quality regression.
Outcomes
After rolling smarter subagent delegation to production traffic, we saw measurable percentage improvements across reliability and responsiveness (Table 1):
Table 2. Directional agent trajectory analysis behind the A/B test outcome
These results show that better orchestration can improve the developer experience even when the visible feature surface doesn’t change. By teaching Copilot CLI when to delegate, when not to delegate, and how to parallelize the right work, we reduced friction in the agent loop itself.
That is the power of GitHub Copilot as a system: the experience gets better not because developers are given more switches to manage, but because Copilot becomes better at allocating models, tools, and subagents behind the scenes.
How this benefits developers today
For developers using Copilot CLI, this should feel like a smoother day-to-day experience. Straightforward tasks are more likely to be handled directly, complex tasks still get specialist help when it adds value, and long-running sessions keep moving with less unnecessary waiting. In practice, Copilot CLI becomes more efficient and less noisy without asking developers to work differently.
The change is intentionally behind the scenes. Your workflow stays the same, but Copilot CLI is better at coordinating the work: fewer unnecessary handoffs, less repeated search work, fewer failed tool paths, and faster progress on long-running or multi-step tasks.
What’s next
This work is one step toward our larger goal of improving how Copilot CLI chooses the right model, agent, and tools across your workflow. While having more agents and models available expands what Copilot can do, the value to developers depends on how well Copilot applies them across the work they are already doing, like reading files, running commands, and moving from an issue toward a pull request.
As tasks become more complex, the quality of that orchestration matters more. The best system is not the one that delegates the most, but the one that knows when to act directly, when to delegate, and how to keep work moving without adding friction.
The next step is making Copilot CLI more adaptive across models, agents, skills, and tools, so developers don’t have to decide whether a task needs a larger model, a specialist subagent, or a procedural skill. Copilot should make that decision based on the task, repository context, policy, and expected outcome.
We will continue improving how Copilot CLI plans work, coordinates subagents, and measures end-to-end outcomes. That includes better visibility into main-agent and subagent behavior, deeper analysis of failure reasons, and stronger proxy metrics for orchestration quality. The goal is simple: less waiting, fewer avoidable failures, and more useful progress from every agent session.
Get started today and share feedback
Update GitHub Copilot CLI by running the /update command in your terminal to version 1.0.42 or later.
Already tried it? We’d love to hear what you think. Share feedback with the /feedback command in a CLI session or open an issue in our public repository.
Acknowledgements
Smarter subagent delegation was made possible by collaboration across Code|AI, Copilot CLI, experimentation, human evaluation, and product teams. Thanks to everyone who helped identify the problem, design the process, validate the outcome, and ship the improvement to production.
Install and configure LSP servers for GitHub Copilot CLI, replacing brute-force grep/decompile with real code intelligence. The post Give GitHub Copilot CLI real code intelligence with language servers appeared first on The GitHub Blog.
Ever watched GitHub Copilot CLI extract a JAR file to a temporary directory, grep through .class files, and piece together an API signature from raw bytecode? The agent is resourceful, but without a language server, that’s the best it can do.
The Language Server Protocol (LSP) is the standard that powers go to definition, find references, and type resolution in editors like VS Code. It works just as well in the terminal. The LSP Setup skill automates the installation and configuration of LSP servers for Copilot CLI, so the agent gets precise, structured answers about your code instead of relying on text search heuristics.
In this post, you’ll learn how the skill works under the hood, see the configuration format it generates, and get set up for any of the 14 languages it supports today.
The problem: heuristic code understanding
Without an LSP server, the agent in GitHub Copilot CLI reverse-engineers API information through text search and binary extraction. For a Java project, that might look like:
# Find the dependency JAR
find ~/.m2/repository -name "*httpclient*.jar"

# Extract it to a temp directory
mkdir /tmp/httpclient && cd /tmp/httpclient
jar xf ~/.m2/repository/org/apache/httpcomponents/httpclient/4.5.14/httpclient-4.5.14.jar

# Search extracted class files for a method
grep -r "execute" --include="*.class" .
For Python, the agent might cat files inside site-packages. For TypeScript, it walks node_modules. These text-based approaches work for simple cases, but they’re doing pattern-matching over raw text rather than true semantic analysis, so they miss generics, overloads, and transitive types, and can’t see compiled bytecode at all. That’s exactly the gap a language server close.
An LSP server solves this structurally. When the agent sends a textDocument/definition request for a symbol, the language server returns the exact source location, fully resolved type, and signature.
How the LSP Setup skill works
When triggered, the skill executes a seven-step workflow:
1. Language selection
The agent uses ask_user with a set of choices to determine which language the user needs LSP support for. This drives all subsequent steps.
2. Operating system detection
The agent runs uname -s (or checks $env:OS / %OS% on Windows) to determine the target platform. Install commands vary by operating system. For example, brew install jdtls on macOS versus downloading from eclipse.org on Linux.
3. LSP server lookup
The skill includes a reference file (references/lsp-servers.md) with curated data for 14 languages: install commands per operating system, binary names, and ready-to-use config snippets. The agent reads this file and selects the matching entry.
4. Configuration scope
The agent asks whether the config should be:
User-level: ~/.copilot/lsp-config.json—applies to all repositories
Repository-level: lsp.json at the repository root or .github/lsp.json—scoped to a single project
Repository-level configuration takes precedence when both exist.
5. Installation
The agent runs the appropriate install command. For example:
# TypeScript on any OS
npm install -g typescript typescript-language-server

# Java on macOS
brew install jdtls

# Rust on any OS
rustup component add rust-analyzer
6. Configuration
The agent writes or merges an entry into the chosen config file. The format uses a lspServers object where each key is a server identifier:
args typically includes "--stdio" for standard I/O transport (some servers like jdtls handle this internally)
fileExtensions maps each extension (with leading dot) to a language identifier
Existing entries in the config file are preserved — the agent merges, never overwrites
7. Verification
The agent runs which <binary> (or where.exe on Windows) to confirm the server is accessible, then validates the config file is well-formed JSON.
Supported languages
The skill comes with a set of predefined language servers for several programming languages. If the coding agent faces one that it is not mapped out already, it will search for an appropriate server and walk you through manual configuration.
What changes after setup
Once an LSP server is configured, the CLI agent can:
Resolve types across dependencies — no more grepping through JAR files or node_modules
Jump to definitions in third-party libraries, even when source isn’t checked into the repository
Find all references to a symbol across the project
Read hover documentation for any function, class, or type
This means the agent spends less time on tool calls and produces more accurate code on the first pass. For you, that’s less time waiting while the agent decompiles a JAR file or greps through node_modules to answer a question your IDE already knows, and fewer wrong turns built on a misread signature. The agent reasons about your code with the same structured understanding you get from go-to-definition in your editor, so you can hand it bigger, gnarlier tasks and trust the result.
Restart GitHub Copilot CLI: if Copilot CLI is already running, type /exit first. Then relaunch copilot so it picks up the new skill.
Ask the agent to set up a language server: for example, “set up LSP for Java” or “enable code intelligence for Python”.
Verify: after the skill installs and configures the LSP server, restart Copilot CLI one more time (/exit, then relaunch), run /lsp to check the server status, and try go-to-definition on a symbol from one of your dependencies.
The skill is part of the Awesome Copilot project. It’s open source, so contributions and feedback are welcome!