• maiweb v0.1.0
  • ★
  • Feedback

Mozilla Hacks

active · last success 2026-06-19 22:13

Visit site ↗ · Feed ↗

  • Mozilla Hacks hacks.mozilla.org browser mozilla standards technology web-dev web-development 2026-05-21 18:00
    ↗

    Support for Web Serial in Firefox 151 for Desktop Firefox can now connect directly to microcontrollers, development boards, 3D printers, power meters, and other serial-connected hardware from the web. Starting in Firefox 151 for Desktop, support for the Web Serial API allows...

    Support for Web Serial in Firefox 151 for Desktop

    Firefox can now connect directly to microcontrollers, development boards, 3D printers, power meters, and other serial-connected hardware from the web. Starting in Firefox 151 for Desktop, support for the Web Serial API allows web applications to communicate with compatible devices without requiring native software.

    Web Serial compatible devices are popular among hobbyists, hardware hackers, educators, makers, and developers with use cases ranging from home automation to hardware prototyping and 3D printing. Web Serial support makes Firefox more useful for these kinds of projects.

    One of the organizations that has demonstrated the value of Web Serial is Adafruit, a leader in open-source hardware and STEM education. They’ve made it quick and easy to install CircuitPython on their devices by delivering firmware over Web Serial. Then it’s straightforward to run Python programs on the device. Name your file code.py and, for most devices, the code can be installed by dragging-and-dropping the file onto the USB device. Your Python programs can interoperate with a web page over Web Serial using simple text-based I/O.

    To install CircuitPython firmware with Firefox, we recommend using the Adafruit Web Serial Tool and not the OPEN INSTALLER method on the CircuitPython site.

    Here’s an example using an Adafruit ESP32-S2 based board where messages sent from web code can be directly displayed on the device over Web Serial.

    A video showing an example CircuitPython Web Serial project where a message is sent from a local web page using Web Serial to a device running a CircuitPython code.py file.

    We’ve collaborated with Adafruit to test Firefox’s implementation against real hardware workflows commonly used by this community. The result: Firefox is a more practical browser for programming and interacting with hardware directly using web technology.

    As an example of how you can combine Web Serial with electronics, Mozilla engineer Alex Franchuk created an amazingly fun and functional device that melds electronics and web editing. Check out the Page Playground.

    The list of serial compatible devices includes Espressif ESP-based boards such as the popular ESP32 chips, Raspberry Pi Picos, 3D printers, LEGO devices, and many more. There are many tools for running your own code on these small affordable microcontroller boards, and with Web Serial it’s easier than ever to connect them to a computer and interact through a web-based user interface.

    What is Web Serial?

    Web Serial is a web API that allows a website to read and write to serial devices using JavaScript. See the MDN documentation for the details. While modern computers don’t typically include serial ports, serial devices connected to a USB port or paired via Bluetooth can advertise themselves as serial-capable devices so they appear as serial ports in the operating system.

    The Web Serial API lets developers use the web platform to communicate with these devices. For example, websites can control devices or deliver firmware without requiring native applications or installers.

    Mozilla’s own Florian Quèze, who has experimented with many projects to measure power consumption, demonstrated how Web Serial could be used to read power data from an off-the-shelf USB power meter and display it in Firefox. Florian’s code can also export the data into the Firefox Profiler, making it easy to visualize and share power data. Here’s the page and GitHub repo. The screenshots below show the page in action and the data in the Firefox Profiler after recording the power usage of a light with three brightness modes.

    A screenshot of Florian’s site showing a power recording of a light with three brightness modes.

    A screenshot of Florian’s site showing a power recording of a light with three brightness modes.The power meter used in the pictured power tests was the AVHzY C3 USB. The Joy-IT TC66C and YZXStudio USB ZY1280 were also successfully tested.

    A screenshot of the Firefox Profiler displaying the imported power recording from Florian’s site.

    A screenshot of the Firefox Profiler displaying the imported power recording from Florian’s site.

    Home Assistant is another example. It’s a popular (and growing) open source project for home automation. The ESPHome project offers Home Assistant-compatible firmware for affordable ESP32 and similar devices which can be installed and configured over Web Serial in just a few clicks.

    Security and Privacy

    There are clear security and privacy concerns with allowing the web platform to read and write to hardware devices. Most importantly, with Web Serial, websites do not have visibility or access to serial ports until the user explicitly allows it.

    Ports are allowed on a per-site and per-port basis. The Web Serial API requires websites to call navigator.serial.requestPort(), which lets the user choose which port to allow access to, or disallow all access entirely. This means websites do not receive a list of connected devices and there is no useful fingerprinting information outside of the port the user selects.

    A screenshot of the Web Serial port selection prompt in Firefox.

    A screenshot of the Web Serial port selection prompt in Firefox.

    To help users understand when and why a site requests access to a serial port, Firefox uses add-on gating which we introduced with our Web MIDI API implementation. Compared to other web permission prompts, this gives the user a more detailed explanation of what they’re allowing. The add-on gating prompts appear before the port selection prompt the first time a site requests port access.

    For organizations using Firefox Enterprise Policies, Web Serial is disabled by default. Administrators can explicitly allow or disallow Web Serial functionality across their organization using the DefaultSerialGuardSetting policy setting.

    Standardization

    While Web Serial still resides in the Web Incubator Community Group (WICG), we’re optimistic there’s a path to standardization given its scope and long-running incubation. We are pursuing standardizing the Web Serial API in the WHATWG in a new Workstream proposal and are excited to work with ecosystem partners and standards bodies to help shape access to peripherals on the web.

    Feedback

    If you already have a Web Serial workflow with a device you can test on, give Firefox a try. We’d love to hear what you’re building and which workflows matter most to you. Mozilla Connect is a great place to share projects, ask questions, and give feedback.

    For technical issues, browse to support.mozilla.org or file a bug here.

    The post Announcing Web Serial Support in Firefox appeared first on Mozilla Hacks - the Web developer blog.

  • Mozilla Hacks hacks.mozilla.org browser mozilla standards technology web-dev web-development 2026-05-07 16:01
    ↗

    Two weeks ago we announced that we had identified and fixed an unprecedented number of latent security bugs in Firefox with the help of Claude Mythos Preview and other AI models. In this post, we’ll go into more detail about how we approached this work, what we found, and...

    Two weeks ago we announced that we had identified and fixed an unprecedented number of latent security bugs in Firefox with the help of Claude Mythos Preview and other AI models. In this post, we’ll go into more detail about how we approached this work, what we found, and advice for other projects on making good use of emerging capabilities to harden themselves against attack.

    Suddenly, the bugs are very good

    Just a few months ago, AI-generated security bug reports to open source projects were mostly known for being unwanted slop. Dealing with reports that look plausibly correct but are wrong imposes an asymmetric cost on project maintainers: it’s cheap and easy to prompt an LLM to find a “problem” in code, but slow and expensive to respond to it.

    It is difficult to overstate how much this dynamic changed for us over a few short months. This was due to a combination of two main factors. First, the models got a lot more capable. Second, we dramatically improved our techniques for harnessing these models — steering them, scaling them, and stacking them to generate large amounts of signal and filter out the noise.

    Ordinarily we keep detailed bug reports private for several months after shipping fixes and issuing security advisories, largely as a precaution to protect any users who, for whatever reason, were slow to update to the latest version of Firefox. Given the extraordinary level of interest in this topic and the urgency of action needed throughout the software ecosystem, we’ve made the calculated decision to unhide a small sample of the reports behind the fixes we recently shipped. We’ve attempted to draw them from a range of browser subsystems, but the selection process was still somewhat arbitrary. Nevertheless, we hope that the depth and diversity of these reports lends credence to our assessment of the capabilities and our calls for defenders to begin applying these techniques:

    Bug ID Description
    2024918 An incorrect equality check can cause the JIT to optimize away the initialization of a live WebAssembly GC struct, creating a fake-object primitive with potential arbitrary read/write in code that had undergone extensive fuzzing by internal and external researchers.
    2024437 A 15-year-old bug in the <legend> element triggered by meticulous orchestration of edge cases across distant parts of the browser, including recursion stack depth limits, expando properties, and cycle collection.
    2021894 Reliably exploits a race condition over IPC, allowing a compromised content process to manipulate IndexedDB refcounts in the parent to trigger a UAF and potential sandbox escape.
    2022034 A raw NaN crossing an IPC boundary can masquerade as a tagged JS object pointer, turning double deserialization into a parent-process fake-object primitive for a sandbox escape.
    2024653 An intricate testcase weaving through nested event loops, pagehide listeners, and garbage collection to trigger a UAF in the attribute setter for <object> elements.
    2022733 Triggers a parent UAF by flooding WebTransport with thousands of certificate hashes to stretch a race condition in a refcount-heavy copy loop, and exploits that race condition over IPC from a compromised content process.
    2023958 Simulates a malicious DNS server by intercepting glibc DNS function calls in order to reproduce a UDP->TCP fallback edge case, triggering a buffer over-read and parent-process stack memory leak during HTTPS RR & ECH parsing.
    2025977 20-year-old XSLT bug in which reentrant key() calls cause a hash table rehash that frees its backing store while a raw entry pointer is still in use (one of several sec-high issues we fixed involving XSLT).
    2027298 Patches the color picker to simulate otherwise non-automatable user selection, then uses a synchronous input event to spin a nested event loop that re-enters actor teardown and frees the callback while it is still unwinding, triggering a content process UAF.
    2023817 A compromised content process could send an arbitrary wallpaper image to be decoded in the parent process, which could be paired with a hypothetical vulnerability in an image decoder to escape the sandbox. This entailed difficult-to-automate reasoning about the trust-level of inputs in the parent process.
    2029813 Escapes our in-process sandboxing technology for third-party libraries (RLBox) by leveraging a gap in the verification logic used to copy values from the untrusted to the trusted side of the sandbox boundary.
    2026305 Extremely small testcase that exploits the special rowspan=0 semantics in HTML tables by appending >65535 rows to bypass clamping and overflow a 16-bit layout bitfield, which went undetected for years by fuzzers.

    Note that a number of these bugs are sandbox escapes, which would need to be combined with other exploits to achieve a full-chain Firefox compromise. These reports presume that the sandboxed process that renders site content has already been compromised with some separate bug, and is now running attacker-controlled machine code attempting to escalate control into the privileged parent process. When crafting a sandbox escape, the model is permitted to patch the Firefox source code, so long as the modified code is restricted to run only in the sandboxed process[1]. Such bugs are notoriously difficult to find with fuzzing, and while we’ve had some success developing new techniques to close this gap, AI analysis provides much more comprehensive coverage of this critical surface.

    Just as interesting as what the models found is what they didn’t find — not because they didn’t try, but because they were unable to circumvent Firefox’s layered defenses. For example, in recent years we received several clever reports from security researchers that managed to escape the process sandbox by triggering prototype pollution in the privileged parent process. Rather than fixing these problems one-by-one, we made an architectural change to freeze these prototypes by default. While auditing logs from the harness, we saw many attempts to pursue this line of escape that were thwarted by this design. Observing such direct payoff from previous hardening work was even more rewarding than finding and fixing more bugs.

    Harnessing Models to Build a Hardening Pipeline

    We’ve experimented internally with LLM code audits over the past few years, with early attempts using models like GPT 4 or Sonnet 3.5 to statically analyze high risk code for vulnerabilities. These experiments showed some promise, but the high rate of false positives made them impractical to scale.

    The introduction of agentic harnesses that can reliably detect security issues has completely changed this. These can find real bugs and dismiss unreproducible speculation. The key feature of such a harness is that, given the right interfaces and instructions, it can create and run reproducible test cases to dynamically test hypotheses about bugs in code. After fixing the initial set of issues that Anthropic sent to us in February, we built our own harness atop our existing fuzzing infrastructure.

    We began with small-scale experiments prompting the harness to look for sandbox escapes with Claude Opus 4.6. Even with this model, we identified an impressive amount of previously-unknown vulnerabilities which required complex reasoning over multiprocess browser engine code. At first, we supervised the process in the terminal to observe the process in real-time and tune the prompts and logic. Once this was working well, we parallelized the jobs across multiple ephemeral VMs, each tasked to hunt for bugs within a specific target file and write its findings back to a bucket.

    A discovery subsystem is necessary but not sufficient. In order to scale the effort, we needed to integrate it with our full security bug lifecycle: determining what to look for, where to look, and how to handle what it produces. This last part includes deduplicating against known issues, tracking bugs, triaging them, and getting fixes shipped. While the model is the core primitive powering the harness, this full pipeline is necessary to make it useful at scale.

    While harnesses may be reusable across projects, this pipeline is inherently project-specific, reflecting each codebase’s semantics, tooling, and processes. Standing this up required significant iteration, with a tight feedback loop alongside the Firefox engineers who were fielding the incoming bugs.

    Upgrading the Models

    Once the end-to-end pipeline is in place, it’s trivial to swap in different models when they become available. Building this pipeline early helped us find a number of serious bugs using publicly-available models, and it also helped us hit the ground running when we had the opportunity to evaluate Claude Mythos Preview. In our experience, model upgrades increase the effectiveness of the entire pipeline: the system gets simultaneously better at finding potential bugs, creating proof-of-concept test cases to demonstrate them, and articulating their pathology and impact.

    In addition to fixing the 271 bugs identified by Claude Mythos Preview in the 150 release, we’ve shipped more of these fixes in 149.0.2, 150.0.1, and 150.0.2. We also continue to find bugs with other means internally, and, similar to other projects, we’ve seen a significant uptick in external reports in the last few months.

    A graph showing the volume of Firefox security bug fixes shipped by month, trending in the 20-30 range throughout each month in 2025, with a spike to 60-70 in February and March 2026, up to 423 in April 2026

    Ultimately, every bug requires care and attention to properly fix. Staying on top of this unprecedented volume has led to a lot of work and long days over the last few months, and we’re extremely proud of how the team has stepped up to meet this challenge. Over 100 people contributed code to this effort to ship the most secure Firefox yet. In addition to writing and reviewing patches, others have been building and scaling this pipeline, triaging, testing the fixes, and managing the release process for each bug.

    Takeaways

    Anyone building software can start using a harness with a modern model to find bugs and harden their code today. We recommend getting started now. You will find bugs, and you will set yourself up to take advantage of new models as soon as they become available.

    You can start with very simple prompting, then observe and iterate. Our initial prompts were not dissimilar from those described here. Through iteration we’ve built out a lot of orchestration and tooling to optimize and scale the pipeline, but the essence of the inner loop remains the same: there is a bug in this part of the code, please find it and build a testcase.

    We haven’t bottomed on all the latent bugs in Firefox, but are quite pleased with the trajectory. Today, our scanning is largely focused on specific areas of the code (files, functions) where we instruct the system to look, based on a mix of human judgement and automated signals. In the near future, we intend to integrate this analysis into our continuous integration system to scan patches as they land in the tree. Models are quite flexible with the form of context provided, and we expect patch-based scanning to work as well or even better than file-based scanning.

    The current moment is a perilous one, but also full of opportunity. Let’s work together to secure the internet.


    FAQ

    The announcement said “271 bugs”, but I count something different. What’s going on?

    On the advisories web page we group all internally-reported bugs as “rollup” CVEs with multiple bugs underneath them. The web page is built from yaml in the foundation-security-advisories repo, the canonical location for our CVE assignments. While some browsers do not create CVE identifiers for internally-discovered issues at all, we provide this information in order to be as transparent as possible.

    In Firefox 150, there were three internal rollups: CVE-2026-6784 (154 bugs), CVE-2026-6785 (55 bugs), and CVE-2026-6786 (107 bugs).

    Astute readers will notice the number of bugs in those internal rollups adds up to 316, which is more than the 271 we announced finding with Claude Mythos Preview. That’s because our security team hunts for new bugs every day by attacking Firefox with a combination of (a) fuzzing systems (b) manual inspection and (c) this new agentic pipeline across a variety of models.

    We fixed a total of 423 security bugs in releases in April. In addition to the 271 bugs announced two weeks ago, there were 41 externally reported bugs, with the remaining 111 discovered internally and split roughly in third between:

    1. Bugs found using this pipeline with Claude Mythos Preview but fixed in releases other than Firefox 150
    2. Bugs found using this pipeline with other models
    3. Bugs found with other techniques like fuzzing

    Note that we also directly credited 3 CVEs to Anthropic separate from this latest effort (CVE-2026-6746, CVE-2026-6757, CVE-2026-6758). These were fixes for bugs sent to us by the outstanding Anthropic Frontier Red team a couple months ago and we assigned unique CVEs for each as per our normal process.

    What do security ratings mean?

    As additional context, we apply security severity ratings from critical to low to indicate the urgency of a bug:

    • sec-critical and sec-high are assigned to vulnerabilities that can be triggered with normal user behavior, like browsing to a web page. We make no technical difference between these, but sec-critical bugs are reserved for issues that are publicly disclosed or known to be exploited in the wild.
    • sec-moderate is assigned to vulnerabilities that would otherwise be rated sec-high but require unusual and complex steps from the victim.
    • sec-low is assigned to bugs that are annoying but far from causing user harm (e.g, a safe crash).

    Of the 271 bugs we announced for Firefox 150: 180 were sec-high, 80 were sec-moderate, and 11 were sec-low.

    While we care most about critical/high bugs, it’s normal for us to prioritize moderate and low security bugs in order to fix correctness issues and as a defense-in-depth mechanism.

    Is a sec-high or sec-critical bug the same as a practical exploit?

    Not necessarily.

    In most cases, a single critical/high bug is not actually enough to compromise Firefox. This is because Firefox has a defense-in-depth architecture, so for example exploiting a JIT bug only achieves remote code execution in a sandboxed and site-specific process. Real-world attackers generally need to chain multiple exploits together to escalate privileges through one or more layers of sandboxing along with OS-level mitigations like ASLR.

    We also generally don’t build exploits to see whether a bug could be used by an attacker in the real world. We classify sec-high based on predictable crash symptoms such as use-after-free or out-of-bounds memory issues being reported by AddressSanitizer, and our threat model assumes that any of them could be exploitable with sufficient effort. This reduces the risk of a false negative during exploitability analysis, and more importantly it allows us to focus our resources on finding and fixing more vulnerabilities.


    [1] Our bug bounty program has similar rules. ↩

    The post Behind the Scenes Hardening Firefox with Claude Mythos Preview appeared first on Mozilla Hacks - the Web developer blog.

  • Mozilla Hacks hacks.mozilla.org browser mozilla standards technology web-dev web-development 2026-05-05 15:49
    ↗

    The open web is a critical platform for applications that handle highly sensitive data, from private communications to financial transactions and medical records. Traditionally, servers are trusted to deliver the appropriate code and resources for their web applications to...

    The open web is a critical platform for applications that handle highly sensitive data, from private communications to financial transactions and medical records. Traditionally, servers are trusted to deliver the appropriate code and resources for their web applications to browsers, who then provide a secure and isolated environment for their execution. In some circumstances, this trust model falls short.

    Consider a browser-based messaging application, like Signal or WhatsApp, which uses end-to-end encryption. The browser depends on the server to provide a trustworthy javascript implementation of the app; which ensures the user’s messages and cryptographic keys are suitably protected. A malicious or compromised server could selectively serve modified code to some users, undermining their security with little risk of detection. This challenges the basic premise of end-to-end encryption: that a misbehaving server should not be able to compromise user security.

    Towards Verifiable Security on the Web

    For web applications to be trustworthy in the presence of malicious servers, two properties are essential:

    • Integrity: The code executed by the user matches what the developer committed to in a manifest.
    • Transparency: These manifests are publicly logged and can be independently audited.

    Web Application Integrity, Consistency and Transparency (WAICT) brings these properties to the web platform.

    WAICT allows websites to cryptographically bind their client-side code to a manifest and commit that manifest to a publicly auditable log. Sites which need this stronger trust model can then opt in to WAICT enforcement. If an opted-in site delivers code that has not been publicly logged, the browser rejects it and attacks that were previously invisible become observable and attributable. This ensures that the code delivered to user’s machines is consistent with the publicly available code which security researchers can inspect.

    Bringing Integrity and Transparency to the Open Web

    We are collaborating with partners across the ecosystem – including Cloudflare, the Freedom of the Press Foundation and Meta – to ensure the deployment model is practical, secure, and as simple as possible. You can learn more about WAICT in our joint talk at Real World Cryptography 2026.

    An early prototype of WAICT is available behind a pref in Firefox Nightly to help validate the approach in real-world scenarios. You can test drive the prototype on https://waict.dev/ – including an end-to-end encrypted video calling app secured by WAICT. The implementation is a work in progress, not a finished solution, but it provides a concrete foundation for iteration and standardization. We’re developing the specifications in the open and welcome early feedback.

    WAICT marks an important step toward making strong, verifiable application security a first-class property of the open web.

    With special thanks to Anna Weine, Benjamin Beurdouche, Christoph Kerschbaumer, Dennis Jackson, Frederik Braun, and Tom Schuster.

    The post Trustworthy JavaScript for the Open Web appeared first on Mozilla Hacks - the Web developer blog.

  • Mozilla Hacks hacks.mozilla.org browser mozilla standards technology web-dev web-development 2026-03-25 16:17
    ↗

    In January, we introduced our Nightly package for RPM-based Linux distributions. Today, we are thrilled to announce it is now available for Firefox Beta! Firefox Beta is great for testing your sites in a version of Firefox that will reach regular users in the coming weeks. If...

    In January, we introduced our Nightly package for RPM-based Linux distributions. Today, we are thrilled to announce it is now available for Firefox Beta!

    Firefox Beta is great for testing your sites in a version of Firefox that will reach regular users in the coming weeks. If you find any issues, please file them on Bugzilla.

    Switching to Mozilla’s RPM repository allows Firefox Beta to be installed and updated like any other application, using your favorite package manager. It also provides a number of improvements:

    •  Better performance thanks to our advanced compiler-based optimizations,
    • Updates as fast as possible because the .rpm management is integrated into Firefox’s release process,
    • Hardened binaries with all security flags enabled during compilation,
    • No need to create your own .desktop file.

    If you have Mozilla’s RPM repository already set up, you can simply install Firefox Beta with your package manager. Otherwise, follow the setup steps below.


    If you are on Fedora (41+), or any other distribution using dnf5 as the package manager


    sudo dnf config-manager addrepo --id=mozilla --set=baseurl=https://packages.mozilla.org/rpm/firefox --set=gpgkey=https://packages.mozilla.org/rpm/firefox/signing-key.gpg --set=gpgcheck=1 --set=repo_gpgcheck=0
    sudo dnf makecache --refresh
    sudo dnf install firefox-beta

    Note: repo_gpgcheck=0 deactivate the signature of metadata with GPG. However, this is safeguarded instead by HTTPS and package signatures (gpgcheck=1).

    If you are on openSUSE or any other distribution using zypper as the package manager

    sudo rpm --import https://packages.mozilla.org/rpm/firefox/signing-key.gpg
    sudo zypper ar --gpgcheck-allow-unsigned-repo https://packages.mozilla.org/rpm/firefox mozilla
    sudo zypper refresh
    sudo zypper install firefox-beta

    For other RPM based distributions (RHEL, CentOS, Rocky Linux, older Fedora versions)

    sudo tee /etc/yum.repos.d/mozilla.repo >  /dev/null << EOF
    [mozilla]
    name=Mozilla Packages
    baseurl=https://packages.mozilla.org/rpm/firefox
    enabled=1
    gpgcheck=1
    repo_gpgcheck=0
    gpgkey=https://packages.mozilla.org/rpm/firefox/signing-key.gpg
    EOF
    # For dnf users
    sudo dnf makecache --refresh
    sudo dnf install firefox-beta
    # For zypper users
    sudo zypper refresh
    sudo zypper install firefox-beta

    The firefox-beta package will not conflict with your distribution’s Firefox package if you have it installed, you can have both at the same time!

    Adding language packs

    If your distribution language is set to a supported language, language packs for it should automatically be installed. You can also install them manually with the following command (replace fr with the language code of your choice):

    sudo dnf install firefox-beta-l10n-fr

    You can list the available languages with the following command:

    dnf search firefox-beta-l10n

    Don’t hesitate to report any problem you encounter to help us make your experience better.

    The post Firefox Developer Edition and Beta: Try out Mozilla’s .rpm package! appeared first on Mozilla Hacks - the Web developer blog.

  • Mozilla Hacks hacks.mozilla.org browser mozilla standards technology web-dev web-development 2026-02-26 16:02
    ↗

    This post is an expanded version of a presentation I gave at the 2025 WebAssembly CG meeting in Munich. WebAssembly has come a long way since its first release in 2017. The first version of WebAssembly was already a great fit for low-level languages like C and C++, and...

    This post is an expanded version of a presentation I gave at the 2025 WebAssembly CG meeting in Munich.

    WebAssembly has come a long way since its first release in 2017. The first version of WebAssembly was already a great fit for low-level languages like C and C++, and immediately enabled many new kinds of applications to efficiently target the web.

    Since then, the WebAssembly CG has dramatically expanded the core capabilities of the language, adding shared memories, SIMD, exception handling, tail calls, 64-bit memories, and GC support, alongside many smaller improvements such as bulk memory instructions, multiple returns, and reference values.

    These additions have allowed many more languages to efficiently target WebAssembly. There’s still more important work to do, like stack switching and improved threading, but WebAssembly has narrowed the gap with native in many ways.

    Yet, it still feels like something is missing that’s holding WebAssembly back from wider adoption on the Web.

    There are multiple reasons for this, but the core issue is that WebAssembly is a second-class language on the web. For all of the new language features, WebAssembly is still not integrated with the web platform as tightly as it should be.

    This leads to a poor developer experience, which pushes developers to only use WebAssembly when they absolutely need it. Oftentimes JavaScript is simpler and “good enough”. This means its users tend to be large companies with enough resources to justify the investment, which then limits the benefits of WebAssembly to only a small subset of the larger Web community.

    Solving this issue is hard, and the CG has been focused on extending the WebAssembly language. Now that the language has matured significantly, it’s time to take a closer look at this. We’ll go deep into the problem, before talking about how WebAssembly Components could improve things.

    What makes WebAssembly second-class?

    At a very high level, the scripting part of the web platform is layered like this:

    WebAssembly can directly interact with JavaScript, which can directly interact with the web platform. WebAssembly can access the web platform, but only by using the special capabilities of JavaScript. JavaScript is a first-class language on the web, and WebAssembly is not.

    This wasn’t an intentional or malicious design decision; JavaScript is the original scripting language of the Web and co-evolved with the platform. Nonetheless, this design significantly impacts users of WebAssembly.

    What are these special capabilities of JavaScript? For today’s discussion, there are two major ones:

    1. Loading of code
    2. Using Web APIs

    Loading of code

    WebAssembly code is unnecessarily cumbersome to load. Loading JavaScript code is as simple as just putting it in a script tag:

    <script src="script.js"></script>

    WebAssembly is not supported in script tags today, so developers need to use the WebAssembly JS API to manually load and instantiate code.

    let bytecode = fetch(import.meta.resolve('./module.wasm'));
    let imports = { ... };
    let { exports } =
      await WebAssembly.instantiateStreaming(bytecode, imports);

    The exact sequence of API calls to use is arcane, and there are multiple ways to perform this process, each of which has different tradeoffs that are not clear to most developers. This process generally just needs to be memorized or generated by a tool for you.

    Thankfully, there is the esm-integration proposal, which is already implemented in bundlers today and which we are actively implementing in Firefox. This proposal lets developers import WebAssembly modules from JS code using the familiar JS module system.

    import { run } from "/module.wasm";
    
    run();

    In addition, it allows a WebAssembly module to be loaded directly from a script tag using type=”module”:

    <script type="module" src="/module.wasm"></script>

    This streamlines the most common patterns for loading and instantiating WebAssembly modules. However, while this mitigates the initial difficulty, we quickly run into the real problem.

    Using Web APIs

    Using a Web API from JavaScript is as simple as this:

    console.log("hello, world");

    For WebAssembly, the situation is much more complicated. WebAssembly has no direct access to Web APIs and must use JavaScript to access them.

    The same single-line console.log program requires the following JavaScript file:

    // We need access to the raw memory of the Wasm code, so
    // create it here and provide it as an import.
    let memory = new WebAssembly.Memory(...);
    
    function consoleLog(messageStartIndex, messageLength) {
      // The string is stored in Wasm memory, but we need to
      // decode it into a JS string, which is what DOM APIs
      // require.
      let messageMemoryView = new UInt8Array(
          memory.buffer, messageStartIndex, messageLength);
      let messageString =
        new TextDecoder().decode(messageMemoryView);
    
      // Wasm can't get the `console` global, or do
      // property lookup, so we do that here.
      return console.log(messageString);
    }
    
    // Pass the wrapped Web API to the Wasm code through an
    // import.
    let imports = {
      "env": {
        "memory": memory,
        "consoleLog": consoleLog,
      },
    };
    let { instance } =
      await WebAssembly.instantiateStreaming(bytecode, imports);
    
    instance.exports.run();
    

    And the following WebAssembly file:

    (module
      ;; import the memory from JS code
      (import "env" "memory" (memory 0))
    
      ;; import the JS consoleLog wrapper function
      (import "env" "consoleLog"
        (func $consoleLog (param i32 i32))
      )
    
      ;; export a run function
      (func (export "run")
        (local i32 $messageStartIndex)
        (local i32 $messageLength)
    
        ;; create a string in Wasm memory, store in locals
        ...
    
        ;; call the consoleLog method
        local.get $messageStartIndex
        local.get $messageLength
        call $consoleLog
      )
    )
    

    Code like this is called “bindings” or “glue code” and acts as the bridge between your source language (C++, Rust, etc.) and Web APIs.

    This glue code is responsible for re-encoding WebAssembly data into JavaScript data and vice versa. For example, when returning a string from JavaScript to WebAssembly, the glue code may need to call a malloc function in the WebAssembly module and re-encode the string at the resulting address, after which the module is responsible for eventually calling free.

    This is all very tedious, formulaic, and difficult to write, so it is typical to generate this glue automatically using tools like embind or wasm-bindgen. This streamlines the authoring process, but adds complexity to the build process that native platforms typically do not require. Furthermore, this build complexity is language-specific; Rust code will require different bindings from C++ code, and so on.

    Of course, the glue code also has runtime costs. JavaScript objects must be allocated and garbage collected, strings must be re-encoded, structs must be deserialized. Some of this cost is inherent to any bindings system, but much of it is not. This is a pervasive cost that you pay at the boundary between JavaScript and WebAssembly, even when the calls themselves are fast.

    This is what most people mean when they ask “When is Wasm going to get DOM support?” It’s already possible to access any Web API with WebAssembly, but it requires JavaScript glue code.

    Why does this matter?

    From a technical perspective, the status quo works. WebAssembly runs on the web and many people have successfully shipped software with it.

    From the average web developer’s perspective, though, the status quo is subpar. WebAssembly is too complicated to use on the web, and you can never escape the feeling that you’re getting a second class experience. In our experience, WebAssembly is a power user feature that average developers don’t use, even if it would be a better technical choice for their project.

    The average developer experience for someone getting started with JavaScript is something like this:

    There’s a nice gradual curve where you use progressively more complicated features as the scope of your project increases.

    By comparison, the average developer experience for someone getting started with WebAssembly is something like this:

    You immediately must scale “the wall” of wrangling the many different pieces to work together. The end result is often only worth it for large projects.

    Why is this the case? There are several reasons, and they all directly stem from WebAssembly being a second class language on the web.

    1. It’s difficult for compilers to provide first-class support for the web

    Any language targeting the web can’t just generate a Wasm file, but also must generate a companion JS file to load the Wasm code, implement Web API access, and handle a long tail of other issues. This work must be redone for every language that wants to support the web, and it can’t be reused for non-web platforms.

    Upstream compilers like Clang/LLVM don’t want to know anything about JS or the web platform, and not just for lack of effort. Generating and maintaining JS and web glue code is a specialty skill that is difficult for already stretched-thin maintainers to justify. They just want to generate a single binary, ideally in a standardized format that can also be used on platforms besides the web.

    2. Standard compilers don’t produce WebAssembly that works on the web

    The result is that support for WebAssembly on the web is often handled by third-party unofficial toolchain distributions that users need to find and learn. A true first-class experience would start with the tool that users already know and have installed.

    This is, unfortunately, many developers’ first roadblock when getting started with WebAssembly. They assume that if they just have rustc installed and pass a –target=wasm flag that they’ll get something they could load in a browser. You may be able to get a WebAssembly file doing that, but it will not have any of the required platform integration. If you figure out how to load the file using the JS API, it will fail for mysterious and hard-to-debug reasons. What you really need is the unofficial toolchain distribution which implements the platform integration for you.

    3. Web documentation is written for JavaScript developers

    The web platform has incredible documentation compared to most tech platforms. However, most of it is written for JavaScript. If you don’t know JavaScript, you’ll have a much harder time understanding how to use most Web APIs.

    A developer wanting to use a new Web API must first understand it from a JavaScript perspective, then translate it into the types and APIs that are available in their source language. Toolchain developers can try to manually translate the existing web documentation for their language, but that is a tedious and error prone process that doesn’t scale.

    4. Calling Web APIs can still be slow

    If you look at all of the JS glue code for the single call to console.log above, you’ll see that there is a lot of overhead. Engines have spent a lot of time optimizing this, and more work is underway. Yet this problem still exists. It doesn’t affect every workload, but it’s something every WebAssembly user needs to be careful about.

    Benchmarking this is tricky, but we ran an experiment in 2020 to precisely measure the overhead that JS glue code has in a real world DOM application. We built the classic TodoMVC benchmark in the experimental Dodrio Rust framework and measured different ways of calling DOM APIs.

    Dodrio was perfect for this because it computed all the required DOM modifications separately from actually applying them. This allowed us to precisely measure the impact of JS glue code by swapping out the “apply DOM change list” function while keeping the rest of the benchmark exactly the same.

    We tested two different implementations:

    1. “Wasm + JS glue”: A WebAssembly function which reads the change list in a loop, and then asks JS glue code to apply each change individually. This is the performance of WebAssembly today.
    2. “Wasm only”: A WebAssembly function which reads the change list in a loop, and then uses an experimental direct binding to the DOM which skips JS glue code. This is the performance of WebAssembly if we could skip JS glue code.

    The duration to apply the DOM changes dropped by 45% when we were able to remove JS glue code. DOM operations can already be expensive; WebAssembly users can’t afford to pay a 2x performance tax on top of that. And as this experiment shows, it is possible to remove the overhead.

    5. You always need to understand the JavaScript layer

    There’s a saying that “abstractions are always leaky”.

    The state of the art for WebAssembly on the web is that every language builds their own abstraction of the web platform using JavaScript. But these abstractions are leaky. If you use WebAssembly on the web in any serious capacity, you’ll eventually hit a point where you need to read or write your own JavaScript to make something work.

    This adds a conceptual layer which is a burden for developers. It feels like it should just be enough to know your source language, and the web platform. Yet for WebAssembly, we require users to also know JavaScript in order to be a proficient developer.

    How can we fix this?

    This is a complicated technical and social problem, with no single solution. We also have competing priorities for what is the most important problem with WebAssembly to fix first.

    Let’s ask ourselves: In an ideal world, what could help us here?

    What if we had something that was:

    1. A standardized self-contained executable artifact
    2. Supported by multiple languages and toolchains
    3. Which handles loading and linking of WebAssembly code
    4. Which supports Web API usage

    If such a thing existed, languages could generate these artifacts and browsers could run them, without any JavaScript involved. This format would be easier for languages to support and could potentially exist in standard upstream compilers, runtimes, toolchains, and popular packages without the need for third-party distributions. In effect, we could go from a world where every language re-implements the web platform integration using JavaScript, to sharing a common one that is built directly into the browser.

    It would obviously be a lot of work to design and validate a solution! Thankfully, we already have a proposal with these goals that has been in development for years: the WebAssembly Component Model.

    What is a WebAssembly Component?

    For our purposes, a WebAssembly Component defines a high-level API that is implemented with a bundle of low-level WebAssembly code. It’s a standards-track proposal in the WebAssembly CG that’s been in development since 2021.

    Already today, WebAssembly Components…

    • Can be created from many different programming languages.
    • Can be executed in many different runtimes (including in browsers today, with a polyfill).
    • Can be linked together to allow code re-use between different languages.
    • Allow WebAssembly code to directly call Web APIs.

    If you’re interested in more details, check out the Component Book or watch “What is a Component?”.

    We feel that WebAssembly Components have the potential to give WebAssembly a first-class experience on the web platform, and to be the missing link described above.

    How could they work?

    Let’s try to re-create the earlier console.log example using only WebAssembly Components and no JavaScript.

    NOTE: The interactions between WebAssembly Components and the web platform have not been fully designed, and the tooling is under active development.

    Take this as an aspiration for how things could be, not a tutorial or promise.

    The first step is to specify which APIs our application needs. This is done using an IDL called WIT. For our example, we need the Console API. We can import it by specifying the name of the interface.

    component {
      import std:web/console;
    }

    The std:web/console interface does not exist today, but would hypothetically come from the official WebIDL that browsers use for describing Web APIs. This particular interface might look like this:

    package std:web;
    
    interface console {
      log: func(msg: string);
      ...
    }

    Now that we have the above interfaces, we can use them when writing a Rust program that compiles to a WebAssembly Component:

    use std::web::console;
    
    fn main() {
      console::log(“hello, world”);
    }

    Once we have a component, we can load it into the browser using a script tag.

    <script type="module" src="component.wasm"></script>

    And that’s it! The browser would automatically load the component, bind the native web APIs directly (without any JS glue code), and run the component.

    This is great if your whole application is written in WebAssembly. However, most WebAssembly usage is part of a “hybrid application” which also contains JavaScript. We also want to simplify this use case. The web platform shouldn’t be split into “silos” that can’t interact with each other. Thankfully, WebAssembly Components also address this by supporting cross-language interoperability.

    Let’s create a component that exports an image decoder for use from JavaScript code. First we need to write the interface that describes the image decoder:

    interface image-lib {
      record pixel {
        r: u8;
        g: u8;
        b: u8;
        a: u8;
      }
    
      resource image {
        from-stream:
          static async func(bytes: stream<u8>) -> result<image>;
        get: func(x: u32, y: u32) -> pixel;
      }
    }
    
    component {
        export image-lib;
    }
    

    Once we have that, we can write the component in any language that supports components. The right language will depend on what you’re building or what libraries you need to use. For this example, I’ll leave the implementation of the image decoder as an exercise for the reader.

    The component can then be loaded in JavaScript as a module. The image decoder interface we defined is accessible to JavaScript, and can be used as if you were importing a JavaScript library to do the task.

    import { Image } from "image-lib.wasm";
    
    let byteStream = (await fetch("/image.file")).body;
    let image = await Image.fromStream(byteStream);
    
    let pixel = image.get(0, 0);
    
    console.log(pixel); // { r: 255, g: 255, b: 0, a: 255 }

    Next Steps

    As it stands today, we think that WebAssembly Components would be a step in the right direction for the web. Mozilla is working with the WebAssembly CG to design the WebAssembly Component Model. Google is also evaluating it at this time.

    If you’re interested to try this out, learn to build your first component and try it out in the browser using Jco or from the command-line using Wasmtime. The tooling is under heavy development, and contributions and feedback are welcome. If you’re interested in the in-development specification itself, check out the component-model proposal repository.

    WebAssembly has come very far from when it was first released in 2017. I think the best is still yet to come if we’re able to turn it from being a “power user” feature, to something that average developers can benefit from.

    The post Why is WebAssembly a second-class language on the web? appeared first on Mozilla Hacks - the Web developer blog.

  • Mozilla Hacks hacks.mozilla.org browser mozilla standards technology web-dev web-development 2026-02-24 13:00
    ↗

    Cross-site scripting (XSS) remains one of the most prevalent vulnerabilities on the web. The new standardized Sanitizer API provides a straightforward way for web developers to sanitize untrusted HTML before inserting it into the DOM. Firefox 148 is the first browser to ship...

    Cross-site scripting (XSS) remains one of the most prevalent vulnerabilities on the web. The new standardized Sanitizer API provides a straightforward way for web developers to sanitize untrusted HTML before inserting it into the DOM. Firefox 148 is the first browser to ship this standardized security enhancing API, advancing a safer web for everyone. We expect other browsers to follow soon.

    An XSS vulnerability arises when a website inadvertently lets attackers inject arbitrary HTML or JavaScript through user-generated content. With this attack, an attacker could monitor and manipulate user interactions and continually steal user data for as long as the vulnerability remains exploitable. XSS has a long history of being notoriously difficult to prevent and has ranked among the top three web vulnerabilities (CWE-79) for nearly a decade.

    Firefox has been deeply involved in solutions for XSS from the beginning, starting with spearheading the Content-Security-Policy (CSP) standard in 2009. CSP allows websites to restrict which resources (scripts, styles, images, etc.) the browser can load and execute, providing a strong line of defense against XSS. Despite a steady stream of improvements and ongoing maintenance, CSP did not gain sufficient adoption to protect the long tail of the web as it requires significant architectural changes for existing web sites and continuous review by security experts.

    The Sanitizer API is designed to help fill that gap by providing a standardized way to turn malicious HTML into harmless HTML — in other words, to sanitize it. The setHTML( ) method integrates sanitization directly into HTML insertion, providing safety by default. Here is an example of sanitizing a simple unsafe HTML:

    document.body.setHTML(`<h1>Hello my name is <img src="x" 
    onclick="alert('XSS')">`);

    This sanitization will allow the HTML <h1> element while removing the embedded <img> element and its onclick attribute, thereby eliminating the XSS attack resulting in the following safe HTML:

    <h1>Hello my name is</h1>

    Developers can opt into stronger XSS protections with minimal code changes by replacing error-prone innerHTML assignments with setHTML(). If the default configuration of setHTML( ) is too strict (or not strict enough) for a given use case, developers can provide a custom configuration that defines which HTML elements and attributes should be kept or removed. To experiment with the Sanitizer API before introducing it on a web page, we recommend exploring the Sanitizer API playground.

    For even stronger protections, the Sanitizer API can be combined with Trusted Types, which centralize control over HTML parsing and injection. Once setHTML( ) is adopted, sites can enable Trusted Types enforcement more easily, often without requiring complex custom policies. A strict policy can allow setHTML( ) while blocking other unsafe HTML insertion methods, helping prevent future XSS regressions.

    The Sanitizer API enables an easy replacement of innerHTML assignments with setHTML( ) in existing code, introducing a new safer default to protect users from XSS attacks on the web. Firefox 148 supports the Sanitizer API as well as Trusted Types, which creates a safer web experience. Adopting these standards will allow all developers to prevent XSS without the need for a dedicated security team or significant implementation changes.


    Image credits for the illustration above: Website, by Desi Ratna; Person, by Made by Made; Hacker by Andy Horvath.


    The post Goodbye innerHTML, Hello setHTML: Stronger XSS Protection in Firefox 148 appeared first on Mozilla Hacks - the Web developer blog.

  • Mozilla Hacks hacks.mozilla.org browser mozilla standards technology web-dev web-development 2026-02-12 17:07
    ↗

    The Interop Project is a cross-browser initiative to improve web compatibility in areas that offer the most benefit to both users and developers. The group, including Apple, Google, Igalia, Microsoft, and Mozilla, takes proposals of features that are well defined in a...

    The Interop Project is a cross-browser initiative to improve web compatibility in areas that offer the most benefit to both users and developers.

    The group, including Apple, Google, Igalia, Microsoft, and Mozilla, takes proposals of features that are well defined in a sufficiently stable web standard, and have good test suite coverage. Then, we come up with a subset of those proposals that balances web developer priorities (via surveys and bug reports) with our collective resources.

    We focus on features that are well-represented in Web Platform Tests as the pass-rate is how we measure progress, which you can track on the Interop dashboard.

    Once we have an agreed set of focus areas, we use those tests to track progress in each browser throughout the year. And after that, we do it all again!

    But, before we talk about 2026, let’s take a look back at Interop 2025…

    Interop 2025

    Interop dashboard showing browser scores. At the top are two large circles: ‘Interop’ with a score of 95 in green, and ‘Investigations’ with a score of 36 in orange. Below are four browser scores in green circles: Chrome 99, Edge 98, Firefox 99, and Safari 98, each shown with their respective browser icons.

    Firefox started Interop 2025 with a score of 46, so we’re really proud to finish the cycle on 99. But the number that really matters is the overall Interop score, which is a combined score for all four browsers – and the higher this number is, the fewer developer hours are lost to frustrating browser differences.

    The overall Interop score started at 25, and it’s now 95. As a result, huge web platform features became available cross-browser, such as Same-Document View Transitions, CSS Anchor Positioning, the Navigation API, CSS @scope, and the URLPattern API.

    That’s the headline-grabbing part, but in my experience, it’s way more frustrating when a feature is claimed to be supported, but doesn’t work as expected. That’s why Interop 2025 also focused on improving the reliability of existing features like WebRTC, CSS Flexbox, CSS Grid, Pointer Events, CSS backdrop-filter, and more.

    But it’s not just about passing tests

    With some focus areas, in particular CSS Anchor Positioning and the Navigation API, we noticed that it was possible to achieve a good score on the tests while having inconsistent behavior compared to other browsers.

    In some cases this was due to missing tests, but in some cases the tests contradicted the spec. This usually happens when tests are written against a particular implementation, rather than the specified behavior.

    I experienced this personally before I joined Mozilla – I tried to use CSS Anchor Positioning back when it was only shipping in Chrome and Safari, and even with simple use-cases, the results were wildly inconsistent.

    Although it caused delays in these features landing in Firefox, we spent time highlighting these problems by filing issues against the relevant specs, and ensured they got priority in their working groups. As a result, specs became less ambiguous, tests were improved, and browser behavior became more reliable for developers.

    Okay, that’s enough looking at the past. Let’s move on to…

    Interop 2026

    Over 150 proposals were submitted for Interop 2026. We looked through developer feedback, on the issues themselves, and developer surveys like The State of HTML and The State of CSS. As an experiment for 2026, we at Mozilla also invited developers to stack-rank the proposals, the results of which we used in combination with the other data to compare developer preferences between individual features – this is something we want to expand on in the future.

    After carefully examining all the proposals, the Interop group has agreed on 20 focus areas (formed of 33 proposals) and 4 investigation areas. See the Interop repository for the full list, but here are the highlights:

    New features

    As with 2025, part of the effort is about bringing new features to all browser engines.

    Cross-document View Transitions allow transitions to work across documents, without any JavaScript. The sub-features rel="expect" and blocking="render" are included in this focus area..

    Scroll-driven animations allow you to drive animations based on the user’s scroll position. This replaces heavy JavaScript solutions that run on the main thread.

    WebTransport provides a low-level API over HTTP/3, allowing for multiple unidirectional streams, and optional out-of-order delivery. This is a modern alternative to WebSockets.

    CSS container style queries allow you to apply a block of styles depending on the computed values of custom properties on the nearest container. This means, for example, you can have a simple --theme property that impacts a range of other properties.

    JavaScript Promise Integration for Wasm allows WebAssembly to asynchronously ‘suspend’, waiting on the result of an external promise. This simplifies the compilation of languages like C/C++ which expect APIs to run synchronously.

    CSS attr() has been supported across browsers for over 15 years, but only for pseudo-element content. For Interop 2026, we’re focusing on more recent changes that allow attribute values to be used in most CSS values (with URLs being an exception).

    CSS custom highlights let you register a bunch of DOM ranges as a named highlight, which you can style via the ::highlight(name) pseudo-element. The styling is limited, but it means these ranges can span between elements, don’t impact layout, and don’t disrupt things like text selection.

    Scoped Custom Element Registries allow different parts of your DOM tree (such as a shadow root) to use a different set of custom elements definitions, meaning the same tag name can refer to different custom elements depending on where they are in the DOM.

    CSS shape() is a reimagining of path() that, rather than using SVG path syntax, uses a CSS syntax, allowing for mixed units and calc(). In practice, this makes it much easier to design responsive clip-paths and offset-paths.

    And more, including CSS contrast-color, accent-color, dialog closedby, popover=”hint”, fetch upload streams, IDB getAllRecords(), media pseudo-classes such as :playing, and the Navigation API’s precommitHandler.

    Existing feature reliability improvements

    Like in previous years, the backbone of Interop is in improving the reliability of existing features, removing frustrations for web developers.

    In 2026, we’ll be focusing these efforts on particular edge cases in:

    • Range headers & form data in fetch
    • The Navigation API
    • CSS scroll snap
    • CSS anchor positioning
    • Same-document View Transitions
    • JavaScript top-level await
    • The event loop
    • WebRTC
    • CSS user-select
    • CSS zoom

    Some of these are carried over from 2025 focus areas, as shortcomings in the tests and specs were fixed, but too late to be included in Interop 2025.

    Again, these are less headline-grabbing than the shiny new features, but it’s these edge cases where us web developers lose hours of our time. Frustrating, frustrating, hours.

    Interop investigations

    Sometimes, we see a focus area proposal that’s clearly important, but doesn’t fit the requirements of Interop. This is usually because the tests for the feature aren’t sufficient, are in the wrong format, or browsers are missing automation features that are needed to make the feature testable.

    In these cases, we identify what’s missing, and set up an investigation area.

    For interop 2026, we’re looking at…

    Accessibility. This is a continuation of work in 2025. Ultimately, we want browsers to produce consistent accessibility trees from the same DOM and CSS, but before we can write tests for this, we need to improve our testing infrastructure.

    Mobile testing. Another continuation from 2025. In particular, in 2026, we want to figure out an approach for testing viewport changes caused by dynamic UI, such as the location bar and virtual keyboard.

    JPEG XL. The current tests for this are sparse. Existing decoders have more comprehensive test suites, but we need to figure out how these relate to browsers. For example, progressive rendering is an important feature for developers, but how and when browsers should do this (to avoid performance issues) is currently being debated.

    WebVTT. This feature allows for text to be synchronised to video content. The investigation is to go through the test suite and ensure it’s fit for purpose, and amend it where necessary.

    It begins… again

    The selected focus areas mean we’ve committed to more work compared to the other browsers, which is quite the challenge being the only engine that isn’t owned by billionaires. But it’s a challenge we’re happy to take on!

    Together with other members of the Interop group, we’re looking forward to delivering features and fixes over the next year. You can follow along with the progress of all browsers on the Interop dashboard.

    If your favorite feature is missing from Interop 2026, that doesn’t mean it won’t be worked on. JPEG XL is a good example of this. The current test suite meant it wasn’t a good fit for Interop 2026, but we’ve challenged the JPEG XL team at Google Research to build a memory-safe decoder in Rust, which we’re currently experimenting with in Firefox, as is Chrome.

    Interop isn’t the limit of what we’re working on, but it is a cross-browser commitment.

    If you’re interested in details of features as they land in Firefox, and discussions of future features from spec groups, you can follow us on:

    • BlueSky
    • Mastodon
    • LinkedIn
    • Threads
    • YouTube
    • TikTok
    • Instagram

    Partner Announcements

    This is a team effort, and we’ve all made announcement posts like this one. Get other members’ take on it:

    • Apple
    • Google
    • Igalia
    • Microsoft

    The post Launching Interop 2026 appeared first on Mozilla Hacks - the Web developer blog.

  • Mozilla Hacks hacks.mozilla.org browser mozilla standards technology web-dev web-development 2025-08-19 16:03
    ↗

    Firefox is now the first and the only browser to deploy fast and comprehensive certificate revocation checking that does not reveal your browsing activity to anyone (not even to Mozilla). Tens of millions of TLS server certificates are issued each day to secure communications...

    Firefox is now the first and the only browser to deploy fast and comprehensive certificate revocation checking that does not reveal your browsing activity to anyone (not even to Mozilla).

    Tens of millions of TLS server certificates are issued each day to secure communications between browsers and websites. These certificates are the cornerstones of ubiquitous encryption and a key part of our vision for the web. While a certificate can be valid for up to 398 days, it can also be revoked at any point in its lifetime. A revoked certificate poses a serious security risk and should not be trusted to authenticate a server.

    Identifying a revoked certificate is difficult because information needs to flow from the certificate’s issuer out to each browser. There are basically two ways to handle this. The browser either needs to ask an authority in real time about each certificate that it encounters, or it needs to maintain a frequently-updated list of revoked certificates. Firefox’s new mechanism, CRLite, has made the latter strategy feasible for the first time.

    With CRLite, Firefox periodically downloads a compact encoding of the set of all revoked certificates that appear in Certificate Transparency logs. Firefox stores this encoding locally, updates it every 12 hours, and queries it privately every time a new TLS connection is created.

    You may have heard that revocation is broken or that revocation doesn’t work. For a long time, the web was stuck with bad tradeoffs between security, privacy, and reliability in this space. That’s no longer the case. We enabled CRLite for all Firefox desktop (Windows, Linux, MacOS) users starting in Firefox 137, and we have seen that it makes revocation checking functional, reliable, and performant. We are hopeful that we can replicate our success in other, more constrained, environments as well.

    Better privacy and performance

    Prior to version 137, Firefox used the Online Certificate Status Protocol (OCSP) to ask authorities about revocation statuses in real time. Certificate authorities are no longer required to support OCSP, and some major certificate authorities have already announced their intention to wind down their OCSP services. There are several reasons for this, but the foremost is that OCSP is a privacy leak. When a user asks an OCSP server about a certificate, they reveal to the server that they intend to visit a certain domain. Since OCSP requests are typically made over unencrypted HTTP, this information is also leaked to all on-path observers.

    Having gained confidence in the robustness, accuracy and performance of our CRLite implementation, we will be disabling OCSP for domain validated certificates in Firefox 142. Sealing the OCSP privacy leak complements our ongoing efforts to encrypt everything on the internet by rolling out HTTPS-First, DNS over HTTPS, and Encrypted Client Hello.

    Disabling OCSP also has performance benefits: we have found that OCSP requests block the TLS handshake for 100 ms at the median. As we rolled out CRLite, we saw notable improvements in TLS handshake times.

    A graph showing "Median TLS Handshake Time (ms)" and "Revocation mechanism usage" over time. As the percentage of revocation checks performed with CRLite increases from 0% to 80%, the median TLS handshake time decreases from 56.4 ms to 39.9 ms.

    Bandwidth requirements of CRLite

    Users with CRLite download an average of 300 kB of revocation data per day: a 4 MB snapshot every 45 days and a sequence of “delta updates” in-between. (The exact sizes of snapshots and delta updates fluctuate day by day. You can explore the real data on our dashboard.)

    To get a sense for how compact CRLite artifacts are, let’s compare them with Certificate Revocation Lists (CRLs). A CRL is a list of serial numbers that each identify a revoked certificate from a single issuer. Certificate authorities in Mozilla’s root store have disclosed approximately three thousand active CRLs to the Common CA Database. In total, these three thousand CRLs are 300 MB in size, and the only way to keep a copy of them up-to-date is to redownload them regularly. CRLite encodes the same dynamic set of revoked certificates in 300 kB per day. In other words, CRLite is one thousand times more bandwidth-efficient than daily CRL downloads.

    Of course, no browser is performing daily downloads of all CRLs. For a more meaningful comparison, we can consider Chrome’s CRLSets. These are hand-picked sets of revocations that are delivered to Chrome users daily. Recent CRLSets weigh in at 600 kB and include about 1% of all revocations (thirty-five thousand of the four million total). Firefox’s CRLite implementation uses half the bandwidth, updates twice as frequently, and includes all revocations.

    Including all revocations is essential for security as there is no reliable way today to distinguish security-critical revocations from administrative revocations. Roughly half of all revocations are made without a specified reason code, and some of these revocations are likely due to security concerns that the certificate’s owner did not wish to highlight. When reason codes are used, they are often used in an ambiguous way that does not clearly map to security risk. In this environment, the only secure approach is to check all revocations, which is now possible with CRLite.

    State-of-the-art blocklist technology

    You may recall a series of blog posts on our experiments with CRLite back in 2020. We followed these experiments with successful deployments to Nightly, Beta, and 1% of Release users. But the bandwidth requirements for this early CRLite design turned out to be prohibitive.

    We solved our bandwidth issue by developing a novel data structure—the “Clubcard” set membership test. Where the original CRLite design used a “multi-level cascades of Bloom filters”, Clubcard-based CRLite uses a “partitioned two-level cascade of Ribbon filters”. The “two-level cascade” idea was presented by Mike Hamburg at RWC 2022, and “partitioning” is an innovation of our own that we presented in a paper at IEEE S&P 2025 and a talk at RWC 2025.

    Future improvements

    We are working on making CRLite even more bandwidth efficient. We are developing new Clubcard partitioning strategies that will compress mass revocation events more efficiently. We are also integrating support for the HTTP compression dictionary transport, which will further compress delta updates. And we have successfully advocated for shorter certificate validity periods, which will reduce the number of CRLite artifacts that need to encode any given revocation. With these enhancements, we expect the bandwidth requirements of CRLite to trend down over the coming years, even as the TLS ecosystem itself continues to grow.

    Our Clubcard blocklist library, our instantiation of Clubcards for CRLite, and our CRLite backend are freely available for anyone to use. We hope that our success in building fast, private, and comprehensive revocation checking for Firefox will encourage other software vendors to adopt this technology.

    The post CRLite: Fast, private, and comprehensive certificate revocation checking in Firefox appeared first on Mozilla Hacks - the Web developer blog.

  • Mozilla Hacks hacks.mozilla.org browser mozilla standards technology web-dev web-development 2025-03-25 18:31
    ↗

    Beginning in version 138, Firefox will offer an alternative to DLL injection for Data Loss Prevention (DLP) deployments in enterprise environments. DLL Injection DLL injection into Firefox is a topic we’ve covered on the Hacks blog before. In 2023, we blogged about the...

    Beginning in version 138, Firefox will offer an alternative to DLL injection for Data Loss Prevention (DLP) deployments in enterprise environments.

    DLL Injection

    DLL injection into Firefox is a topic we’ve covered on the Hacks blog before. In 2023, we blogged about the Firefox capability to let users block third-party DLLs from being loaded. We explained what DLL injection is, how we deal with problematic third-party modules, our about:third-party page, and our third-party injection policy. Earlier, in 2019, we released a study of DLL injection Firefox bugs in collaboration with Polytechnique Montréal. We return to this topic now, in the context of enterprise Firefox installations.

    First, a reminder of what DLL injection is and why it continues to be problematic. DLL injection is the term we use to describe third-party Windows software injecting its own DLL module code into Firefox. Third parties develop DLLs for injecting into applications to extend their functionality in some way. This is prevalent in the Windows ecosystem. When third-party code is injected, the injected code interacts with the internals of the application. While it is not unusual for software to work together, and the internet is built on software interoperating over documented standards, DLL injection differs in that the undocumented internals of an application are not intended to be a stable interface. As such, they are a poor foundation to build software products on. When the underlying application is changed, it can result in incompatibilities, leading to crashes or other unexpected behavior. In a modern web browser like Firefox, new features and fixes, big and small, are developed and released on a monthly schedule. Normal browser development can therefore cause incompatibilities with injected software, resulting in Firefox crashes, bypassing of security features, or other unpredictable buggy behavior. When these problems arise, they require emergency troubleshooting and engineering of workarounds for users until the problems are addressed by software updates. This often requires collaboration between the browser and the third-party application’s developers. The type of software injected into Firefox varies from small open source projects to widely-deployed enterprise security products. In an attempt to eliminate some of the most difficult DLL injection issues, we’ve turned our attention to Data Loss Prevention enterprise applications.

    Data Loss Prevention (DLP) in the Enterprise

    Data Loss Prevention (DLP) products are a type of software that is widely deployed by organizations to prevent unintended leaks of private data. Examples of private data include customer records such as names, addresses, credit card information or company secrets. Much like how anti-virus software is deployed across a corporation’s fleet of laptops, so too is DLP software. These deployments have become increasingly common, in large part due to compliance and liability concerns.

    How does this relate to Firefox? DLP software typically uses DLL injection to monitor applications such as Firefox for activity that might leak private data. This only applies to specific operations that can leak sensitive information such as file uploads, pasting (as in copy-and-paste), drag-and-drop, and printing.

    DLP and Firefox Today

    Today, DLP software typically monitors Firefox activity via DLL injection as described above. Firefox and web browsers are not unique in this respect, but they are heavily used and under constant development, making DLL injection more dangerous. DLP software is typically deployed to a fleet of corporate computers that are managed by an IT department. This includes deployment of the software that injects into applications. DLP vendors take efforts to ensure that their products are compatible with the latest version of Firefox by testing beta versions and updating their DLLs as needed, but problems still occur regularly. A common issue is that a problem is encountered by corporate users who report the problem to their IT department. Their IT staff then work to debug the problem. They may file a bug report with Firefox or the DLP vendor. When a Firefox bug is filed, it can be a challenge for Mozilla to determine that the bug was actually caused by external software. When we learn of such problems, we alert the vendor and investigate workarounds. In the interim, users have a poor experience and may have to work around problems or even use another browser. When the browser is not functional, the problem becomes a high severity incident where support teams work as quickly as possible to help restore functionality.

    Browsing Privacy

    When users browse on company-owned computers, their browsing privacy is often subject to corporate-mandated software. Different regions have different laws about this and the disclosures required, but on a technical level, when the device is controlled by a corporation, that corporation has a number of avenues at its disposal for monitoring activity at whatever level is dictated by corporate policy. Firefox is built on the principle that browsing activity belongs only to the user, but as an application, it cannot reasonably override the wishes of the device administrator. Insofar as that administrator has chosen to deploy DLP software, they will expect it to work with the other software on the device. If a well-supported mechanism is not available, they will either turn to opaque and error-prone methods like DLL injection, or replace Firefox with another browser.

    What’s New – Reducing DLL Injection in the Enterprise

    Starting with Firefox 138, DLP software can work with Firefox without the use of DLL injection. Firefox 138 integrates the Content Analysis SDK and it can be enabled with Enterprise Policies. The SDK, developed by Google and used in Chrome Enterprise, is a lightweight protocol between the browser and a DLP agent, with the implementation being browser-specific. In other words, Firefox has its own implementation of the protocol. The integration allows Firefox to interact with DLP software while reducing the injection of third-party code. This will improve the stability for Firefox users in the enterprise and, as more DLP vendors adopt the SDK, there will be less third-party code injected into Firefox. With vendors and browsers using the same SDK, vendors can know that a single DLP agent implementation will be compatible with multiple browsers. During development of the Firefox implementation, we’ve been working with some leading DLP vendors to ensure compatibility. In addition to stability, Firefox will display an indicator when the DLP SDK is used, providing more transparency for users.

    For Enterprise Use

    Firefox will only enable the Content Analysis SDK in configurations where a Firefox Enterprise Policy is used. Firefox Enterprise Policies are used by organizations to configure Firefox settings across a fleet of computers. They allow administrators to configure Firefox, for example, to limit which browser extensions can be installed, set security-related browser settings, configure network proxy settings, and more. You can learn more about Firefox Enterprise Policies on our support article Enforce policies on Firefox for Enterprise.

    The post Improving Firefox Stability in the Enterprise by Reducing DLL Injection appeared first on Mozilla Hacks - the Web developer blog.

  • Mozilla Hacks hacks.mozilla.org browser mozilla standards technology web-dev web-development 2025-02-13 16:59
    ↗

    Interop 2025 continues the mission to make the web more consistent across browsers, building on 2024’s 95% interoperability score. This year, 19 focus areas target key developer needs and long-standing issues, including WebRTC improvements, Storage Access API, and CSS Zoom....

    Launching Interop 2025

    The Interop Project is a collaboration between browser vendors and other platform implementors to provide users and web developers with high quality implementations of the web platform.

    Each year we select a set of focus areas representing key areas where we want to improve interoperability. Encouraging all browser engines to prioritize common features ensures they become usable for web developers as quickly as possible.

    Progress in each engine and the overall Interop score are measured by tracking the pass rate of a set of web-platform tests for each focus area using the Interop dashboard.

    Interop 2024

    Before introducing the new focus areas for this year, we should look at the successes of Interop 2024.

    The Interop score, measuring the percentage of tests that pass in all of the major browser engines, has reached 95% in latest browser releases, up from only 46% at the start of the year. In pre-release browsers it’s even higher — over 97%. This is a huge win that shows how effective Interop can be at aligning browsers with the specifications and each other.

    Each browser engine individually achieved a test pass score of 98% in stable browser releases and 99% in pre-release, with Firefox finishing slightly ahead with 98.8% in release and 99.1% in Nightly.

    For users, this means features such as requestVideoFrameCallback, Declarative Shadow DOM, and Popover, which a year ago only had limited availability, are now implemented interoperably in all browsers.

    Interop 2025

    Building on Interop 2024’s success, we are excited to continue the project into 2025. This year we have 19 focus areas; 17 new and 2 from previous years. A full description of all the focus areas is available in the Interop repository.

    From 2024 we’re carrying forward Layout (really “Flexbox and Grid”), and Pointer and Mouse Events. These are important platform primitives where the Interop project has already led to significant interoperability improvements. However, with technologies that are so fundamental to the modern web we think it’s important to set ambitious goals and continue to prioritize these areas, creating rock solid foundations for developers to build on.

    The new focus areas represent a broad cross section of the platform. Many of them — like Anchor Positioning and View Transitions — have been identified from clear developer demand in surveys such as State of HTML and State of CSS. Inclusion in Interop will ensure they’re usable as soon as possible.

    In addition to these high profile new features, we’d like to highlight some lesser-known focus areas and explain why we’re pleased to see them in Interop.

    Storage Access

    At Mozilla user privacy is a core principle. One of the most common methods for tracking across the web is via third-party cookies. When sites request data from external services, the service can store data that’s re-sent when another site uses the same service. Thus the service can follow the user’s browsing across the web.

    To counter this, Firefox’s “Total Cookie Protection” partitions storage so that third parties receive different cookie data per site and thus reduces tracking. Other browsers have similar policies, either by default or in private browsing modes.

    However, in some cases, non-tracking workflows such as SSO authentication depend on third party cookies. Storage partitioning can break these workflows, and browsers currently have to ship site-specific workarounds. The Storage Access API solves this by letting sites request access to the unpartitioned cookies. Interop here will allow browsers to advance privacy protections without breaking critical functionality.

    Web Compat

    The Web Compat focus area is unique in Interop. It isn’t about one specific standard, but focuses on browser bugs known to break sites. These are often in older parts of the platform with long-standing inconsistencies. Addressing these requires either aligning implementations with the standard or, where that would break sites, updating the standard itself.

    One feature in the Web Compat focus area for 2025 is CSS Zoom. Originally a proprietary feature in Internet Explorer, it allowed scaling layout by adjusting the computed dimensions of elements at a time before CSS transforms. WebKit reverse-engineered it, bringing it into Blink, but Gecko never implemented it, due to the lack of a specification and the complexities it created in layout calculations.

    Unfortunately, a feature not being standardised doesn’t prevent developers from using it. Use of CSS Zoom led to layout issues on some sites in Firefox, especially on mobile. We tried various workarounds and have had success using interventions to replace zoom with CSS transforms on some affected sites, but an attempt to implement the same approach directly in Gecko broke more sites than it fixed and was abandoned.

    The situation seemed to be at an impasse until 2023 when Google investigated removing CSS Zoom from Chromium. Unfortunately, it turned out that some use cases, such as Microsoft Excel Online’s worksheet zoom, depended on the specific behaviour of CSS Zoom, so removal was not feasible. However, having clarified the use cases, the Chromium team was able to propose a standardized model for CSS Zoom that was easier to implement without compromising compatibility. This proposal was accepted by the CSS WG and led to the first implementation of CSS Zoom in Firefox 126, 24 years after it was first released in Internet Explorer.

    With Interop 2025, we hope to bring the story of CSS Zoom to a close with all engines finally converging on the same behaviour, backed by a real open standard.

    WebRTC

    Video conferencing is now an essential feature of modern life, and in-browser video conferencing offers both ease of use and high security, as users are not required to download a native binary. Most web-based video conferencing relies on the WebRTC API, which offers high level tools for implementing real time communications. However, WebRTC has long suffered from interoperability issues, with implementations deviating from the standards and requiring nonstandard extensions for key features. This resulted in confusion and frustration for users and undermined trust in the web as a reliable alternative to native apps.

    Given this history, we’re excited to see WebRTC in Interop for the first time. The main part of the focus area is the RTCRtpScriptTransform API, which enables cross browser end-to-end encryption. Although there’s more to be done in the future, we believe Interop 2025 will be a big step towards making WebRTC a truly interoperable web standard.

    Removing Mutation Events

    The focus area for Removing Mutation Events is the first time Interop has been used to coordinate the removal of a feature. Mutation events fire when the DOM changes, meaning the event handlers run on the critical path for DOM manipulation, causing major performance issues, and significant implementation complexity. Despite the fact that they have been implemented in all engines, they’re so problematic that they were never standardised. Instead, mutation observers were developed as a standard solution for the use cases of mutation events without their complexity or performance problems. Almost immediately after mutation observers were implemented, a Gecko bug was filed:

    “We now have mutation observers, and we’d really like to kill support for mutation events at some point in the future. Probably not for a while yet.”

    That was in 2012. The difficulty is the web’s core commitment to backwards compatibility. Removing features that people rely on is unacceptable. However, last year Chromium determined that use of mutation events had dropped low enough to allow a “deprecation trial“, disabling mutation events by default, but allowing specific sites to re-enable them for a limited time.

    This is good news, but long-running deprecation trials can create problems for other browsers. Disabling the feature entirely can break sites that rely on the opt-out. On the other hand we know from experience that some sites actually function better in a browser with mutation events disabled (for example, because they are used for non-critical features, but impact performance).

    By including this removal in Interop 2025, we can ensure that mutation events are fully removed in 2025 and end the year with reduced platform complexity and improved web performance.

    Interop Investigations

    As well as focus areas, the Interop project also runs investigations aimed at long-term interoperability improvements to areas where we can’t measure progress using test pass rates. For example Interop investigations can be looking to add new test capabilities, or increase the test coverage of platform features.

    Accessibility Investigation

    The accessibility testing started as part of Interop 2023. It has added APIs for testing accessible name and computed role, as well as more than 1000 new tests. Those tests formed the Accessibility focus area in Interop 2024, which achieved an Interop score of 99.7%.

    In 2025 the focus will be expanding the testability of accessibility features. Mozilla is working on a prototype of AccessibleNode; an API that enables verifying the shape of the accessibility tree, along with its states and properties. This will allow us to test the effect of features like CSS display: contents or ::before/::after on the accessibility tree.

    Mobile Testing Investigation

    Today, all Interop focus areas are scored in desktop browsers. However, some features are mobile-specific or have interoperability challenges unique to mobile.

    Improving mobile testing has been part of Interop since 2023, and in that time we’ve made significant progress standing up mobile browsers in web-platform-tests CI systems. Today we have reliable runs of Chrome and Firefox Nightly on Android, and Safari runs on iOS are expected soon. However, some parts of our test framework were written with desktop-specific assumptions in the design, so the focus for 2025 will be on bringing mobile testing to parity with desktop. The goal is to allow mobile-specific focus areas in future Interop projects, helping improve interoperability across all device types.

    Driving the Web Forward

    The unique and distinguishing feature of the web platform is its basis in open standards, providing multiple implementations and user choice. Through the Interop project, web platform implementors collaborate to ensure that these core strengths are matched by a seamless user experience across browsers.

    With focus areas covering some of the most important new and existing areas of the modern web, Interop 2025 is set to deliver some of the biggest interoperability wins of the project so far. We are confident that Firefox and other browsers will rise to the challenge, providing users and developers with a more consistent and reliable web platform.

    Partner Announcements

    • Apple
    • Bocoup
    • Google
    • Igalia
    • Microsoft

    The post Launching Interop 2025 appeared first on Mozilla Hacks - the Web developer blog.

  • Mozilla Hacks hacks.mozilla.org browser mozilla standards technology web-dev web-development 2024-12-04 19:38
    ↗

    Mozilla and Filament have introduced Uniffi for React Native, a tool that allows developers to leverage the safety and performance benefits of Rust in cross-platform React Native apps. The post Introducing Uniffi for React Native: Rust-Powered Turbo Modules appeared first on...

    Today Mozilla and Filament are releasing Uniffi for React Native, a new tool we’ve been using to build React Native Turbo Modules in Rust, under an open source license. This allows millions of developers writing cross-platform React Native apps to use Rust  – a modern programming language known for its safety and performance benefits to build single implementations of their app’s core logic to work seamlessly across iOS and Android. 

    This is a big win for us and for Filament who co-developed the library with Mozilla and James Hugman, the lead developer. We think it will be awesome for many other developers too. Less code is good. Memory safety is good. Performance is good. We get all three, plus the joy of using a language we love in more places.

    For those familiar with React Native, it’s a great framework for creating cross-platform apps, but it has its challenges. React Native apps rely on a single JavaScript thread, which can slow things down when handling complex tasks. Developers have traditionally worked around this by writing code twice – once for iOS and once for Android – or by using C++, which can be difficult to manage. Uniffi for React Native offers a better solution by enabling developers to offload heavy tasks to Rust, which is now easy to integrate with React Native. As a result, you’ve got faster, smoother apps and a streamlined development process.

    How Uniffi for React Native works

    Unifii for React Native is a uniFFI bindings generator for using Rust from React Native via Turbo Modules. It lets us work at an abstraction level high enough to stay focused on our applications’s needs rather than getting lost in the gory technical details of bespoke native cross-platform development  It provides tooling to generate:

    • Typescript and JSI C++ to call Rust from Typescript and back again
    • A Turbo-Module that installs the bindings into a running React Native library.

    We’re stoked about this work continuing. In 2020, we started with Uniffi as a modern day ‘write once; run anywhere’ toolset for Rust. Uniffi has come a long way since we developed the technology as a bit of a hack to get us a single implementation of Firefox Sync’s core (in Rust) that we could then deploy to both our Android and iOS apps! Since then Mozilla has used uniffi-rs to successfully deploy Rust in mobile and desktop products used by hundreds of millions of users. This Rust code runs important subsystems such as bookmarks and history sync, Firefox Suggest, telemetry and experimentation. Beyond Mozilla, Uniffi is used in Android (in AOSP), high-profile security products and some complex libraries familiar to the community.

    Currently the Uniffi for React Native project is an early release. We don’t have a cool landing page or examples in the repo (coming!), but open source contributor Johannes Marbach has already been sponsored by Unomed to use Uniffi for React Native to create a React Native Library for the Matrix SDK .

    Need an idea on how you might give it a whirl? I’ve got two uses that we’re very excited about:

    1) Use Rust to offload computationally heavy code to a multi-threaded/memory-safe subsystem to escape single-threaded JS performance bottlenecks in React Native. If you know, you know.

    2) Leverage the incredible library of Rust crates in your React Native app. One of the Filament devs showed how powerful this is, recently. With a rudimentary knowledge of Rust, they were able to find a fast blurhashing library on crates.io to replace a slow Typescript implementation and get it running the same day. We’re hoping we can really improve the tooling even more to make this kind of optimization as easy as possible.

    Uniffi represents a step forward in cross-platform development, combining the power of Rust with the flexibility of React Native to unlock new possibilities for app developers. 

    We’re excited to have the community explore what’s possible. Please check out the library on Github and jump into the conversation on Matrix. 

    Disclosure: in addition to this collaboration, Mozilla Ventures is an investor in Filament. 


    The post Introducing Uniffi for React Native: Rust-Powered Turbo Modules appeared first on Mozilla Hacks - the Web developer blog.

  • Mozilla Hacks hacks.mozilla.org browser mozilla standards technology web-dev web-development 2024-10-16 13:32
    ↗

    Discover the latest release of Llamafile 0.8.14, an open-source AI tool by Mozilla Builders. With a new command-line chat interface, enhanced performance, and support for powerful models, Llamafile makes it easy to run large language models (LLMs) on your own hardware. Learn...

    We’ve just released Llamafile 0.8.14, the latest version of our popular open source AI tool. A Mozilla Builders project, Llamafile turns model weights into fast, convenient executables that run on most computers, making it easy for anyone to get the most out of open LLMs using the hardware they already have.

    New chat interface

    The key feature of this new release is our colorful new command line chat interface. When you launch a Llamafile we now automatically open this new chat UI for you, right there in the terminal. This new interface is fast, easy to use, and an all around simpler experience than the Web-based interface we previously launched by default. (That interface, which our project inherits from the upstream llama.cpp project, is still available and supports a range of features, including image uploads. Simply point your browser at port 8080 on localhost).

    llamafile

    Other recent improvements

    This new chat UI is just the tip of the iceberg. In the months since our last blog post here, lead developer Justine Tunney has been busy shipping a slew of new releases, each of which have moved the project forward in important ways. Here are just a few of the highlights:

    Llamafiler: We’re building our own clean sheet OpenAI-compatible API server, called Llamafiler. This new server will be more reliable, stable, and most of all faster than the one it replaces. We’ve already shipped the embeddings endpoint, which runs three times as fast as the one in llama.cpp. Justine is currently working on the completions endpoint, at which point Llamafiler will become the default API server for Llamafile.

    Performance improvements: With the help of open source contributors like k-quant inventor @Kawrakow Llamafile has enjoyed a series of dramatic speed boosts over the last few months. In particular, pre-fill (prompt evaluation) speed has improved dramatically on a variety of architectures:

    • Intel Core i9 went from 100 tokens/second to 400 (4x).
    • AMD Threadripper went from 300 tokens/second to 2,400 (8x).
    • Even the modest Raspberry Pi 5 jumped from 8 tokens/second to 80 (10x!).

    When combined with the new high-speed embedding server described above, Llamafile has become one of the fastest ways to run complex local AI applications that use methods like retrieval augmented generation (RAG).

    Support for powerful new models: Llamafile continues to keep pace with progress in open LLMs, adding support for dozens of new models and architectures, ranging in size from 405 billion parameters all the way down to 1 billion. Here are just a few of the new Llamafiles available for download on Hugging Face:

    • Llama 3.2 1B and 3B: offering extremely impressive performance and quality for their small size. (Here’s a video from our own Mike Heavers showing it in action.)
    • Llama 3.1 405B: a true “frontier model” that’s possible to run at home with sufficient system RAM.
    • OLMo 7B: from our friends at the Allen Institute, OLMo is one of the first truly open and transparent models available.
    • TriLM: a new “1.58 bit” tiny model that is optimized for CPU inference and points to a near future where matrix multiplication might no longer rule the day.

    Whisperfile, speech-to-text in a single file: Thanks to contributions from community member @cjpais, we’ve created Whisperfile, which does for whisper.cpp what Llamafile did for llama.cpp: that is, turns it into a multi-platform executable that runs nearly everywhere. Whisperfile thus makes it easy to use OpenAI’s Whisper technology to efficiently convert speech into text, no matter which kind of hardware you have.

    Get involved

    Our goal is for Llamafile to become a rock-solid foundation for building sophisticated locally-running AI applications. Justine’s work on the new Llamafiler server is a big part of that equation, but so is the ongoing work of supporting new models and optimizing inference performance for as many users as possible. We’re proud and grateful that some of the project’s biggest breakthroughs in these areas, and others, have come from the community, with contributors like @Kawrakow, @cjpais, @mofosyne, and @Djip007 routinely leaving their mark.

    We invite you to join them, and us. We welcome issues and PRs in our GitHub repo. And we welcome you to become a member of Mozilla’s AI Discord server, which has a dedicated channel just for Llamafile where you can get direct access to the project team. Hope to see you there!


    The post Llamafile v0.8.14: a new UI, performance gains, and more appeared first on Mozilla Hacks - the Web developer blog.

  • Mozilla Hacks hacks.mozilla.org browser mozilla standards technology web-dev web-development 2024-08-08 18:39
    ↗

    As AI continues to evolve, so do the threats against it. As these GenAI systems become more sophisticated and widely adopted, ensuring their security and ethical use becomes paramount. 0Din is a groundbreaking GenAI bug bounty program dedicated specifically to help secure...

    Introduction

    As AI continues to evolve, so do the threats against it. As these GenAI systems become more sophisticated and widely adopted, ensuring their security and ethical use becomes paramount. 0Din is a groundbreaking GenAI bug bounty program dedicated specifically to help secure GenAI systems and beyond. In this blog, you’ll learn about 0Din, how it works, and how you can participate and make a difference in securing our AI future.

    What is 0Din?

    0Din is an innovative GenAI bug bounty program that seeks to identify and mitigate vulnerabilities in AI systems. By harnessing the collective expertise of the global security community, 0Din aims to build a more secure AI landscape. The program rewards individuals who discover and report security flaws, ensuring that AI systems remain robust and trustworthy.

    How the 0Din Bug Bounty Program Works

    Participating in the 0Din bug bounty program is straightforward. Here’s a step-by-step overview:

    1. Identify Vulnerabilities: Participants search for security flaws within the scope defined by 0Din.
    2. Submit Reports: When a vulnerability is found, participants submit a detailed report outlining the issue.
    3. Review Process: 0Din’s team reviews the submission, verifies the vulnerability, and assesses its impact.
    4. Receive Rewards: Verified vulnerabilities are rewarded based on their severity and impact.

    For detailed information on the vulnerability scope and processing policy, visit  the 0Din Policy Page 

    Types of Vulnerabilities Covered

    0Din covers a broad range of vulnerabilities. Here are some examples:

    1. Guardrail Jailbreak: Bypassing safety measures to make the AI perform harmful actions.
    2. Prompt Injection: Inserting malicious input to subvert the AI’s intended operations.
    3. Training Data Leakage: Extracting sensitive information from the training data used to build the AI.

    Each type of vulnerability has a specific reward based on its severity, ranging from low to high. The Disclosure Mappings Guideline provides a comprehensive list of vulnerabilities and their corresponding rewards.

    Eligibility and Participation

    0Din welcomes participants from around the world. Here’s who can participate:

    – Security Researchers: Professionals dedicated to discovering and mitigating security risks.

    – Developers: Individuals with a strong understanding of AI and its underlying technologies.

    – Tech Enthusiasts: Anyone with a keen interest in AI security and the technical skills to identify vulnerabilities.

    To ensure a fair and effective program, participants must adhere to 0Din’s Vulnerability Processing and Disclosure Policy. This policy outlines the proper procedures for reporting vulnerabilities and ensures that all submissions are handled with integrity and respect.

    Vulnerability Processing and Disclosure Policy

    0Din’s vulnerability processing and disclosure policy is designed to ensure transparency and fairness. Key points include:

    1. Submission Review: Each submission is reviewed by a team of experts to verify the vulnerability and assess its impact.
    2. Response Time: 0Din commits to responding to submissions promptly, typically within a few days.
    3. Reward Allocation: Rewards are allocated based on the severity and impact of the vulnerability, following a predefined scale.
    4. Responsible Disclosure: Participants are expected to adhere to responsible disclosure practices, ensuring that vulnerabilities are reported privately and not exploited.

    For a detailed policy overview, refer to the 0Din Policy Page 

    Conclusion

    In an era where AI plays an increasingly vital role in our lives, ensuring its security is paramount. 0Din offers a unique opportunity to contribute to this critical field while being rewarded for your expertise. By participating in the 0Din bug bounty program, you can help build a safer and more secure AI future. Join us today and make a difference in the world of GenAI security.

    The post 0Din: A GenAI Bug Bounty Program – Securing Tomorrow’s AI Together appeared first on Mozilla Hacks - the Web developer blog.

  • Mozilla Hacks hacks.mozilla.org browser mozilla standards technology web-dev web-development 2024-08-07 15:44
    ↗

    We’re pleased to announce that, as of version 23, the Puppeteer browser automation library now has first-class support for Firefox. This means that it’s now easy to write automation and perform end-to-end testing using Puppeteer, and run against both Chrome and Firefox. The...

    We’re pleased to announce that, as of version 23, the Puppeteer browser automation library now has first-class support for Firefox. This means that it’s now easy to write automation and perform end-to-end testing using Puppeteer, and run against both Chrome and Firefox.

    How to Use Puppeteer With Firefox

    To get started, simply set the product to “firefox” when starting Puppeteer:

    import puppeteer from "puppeteer";
    
    const browser = await puppeteer.launch({
      browser: "firefox"
    });
    
    const page = await browser.newPage();
    // ...
    await browser.close();

    As with Chrome, Puppeteer is able to download and launch the latest stable version of Firefox, so running against either browser should offer the same developer experience that Puppeteer users have come to expect.

    Whilst the features offered by Puppeteer won’t be a surprise, bringing support to multiple browsers has been a significant undertaking. The Firefox support is not based on a Firefox-specific automation protocol, but on WebDriver BiDi, a cross browser protocol that’s undergoing standardization at the W3C, and currently has implementation in both Gecko and Chromium. This use of a cross-browser protocol should make it much easier to support many different browsers going forward.

    Later in this post we’ll dive into some of the more technical background behind WebDriver BiDi. But first we’d like to call out how today’s announcement is a great demonstration of how productive collaboration can advance the state of the art on the web. Developing a new browser automation protocol is a lot of work, and great thanks goes to the Puppeteer team and the other members of the W3C Browser Testing and Tools Working Group, for all their efforts in getting us to this point.

    You can also check out the Puppeteer team’s post about making WebDriver BiDi production ready.

    Key Features

    For long-time Puppeteer users, the features available are familiar. However for people in other automation and testing ecosystems — particularly those that until recently relied entirely on HTTP-based WebDriver — this section outlines some of the new functionality that WebDriver BiDi makes possible to implement in a cross-browser manner.

    Capturing of Log Messages

    A common requirement when testing web apps is to ensure that there are no unexpected errors reported to the console. This is also a case where an event-based protocol shines, since it avoids the need to poll the browser for new log messages.

    import puppeteer from "puppeteer";
    
    const browser = await puppeteer.launch({
      browser: "firefox"
    });
    
    const page = await browser.newPage();
    page.on('console', msg => {
      console.log(`[console] ${msg.type()}: ${msg.text()}`);
    });
    
    await page.evaluate(() => console.debug('Some Info'));
    await browser.close();

    Output:

    [console] debug: Some Info

    Device Emulation

    Often when testing a reactive layout it’s useful to be able to ensure that the layout works well at multiple screen dimensions, and device pixel ratios. This can be done by using a real mobile browser, either on a device, or on an emulator. However for simplicity it can be useful to perform the testing on a desktop set up to mimic the viewport of a mobile device. The example below shows loading a page with Firefox configured to emulate the viewport size and device pixel ratio of a Pixel 5 phone.

    import puppeteer from "puppeteer";
    
    const device = puppeteer.KnownDevices["Pixel 5"];
    
    const browser = await puppeteer.launch({
      browser: "firefox"
    });
    
    const page = await browser.newPage();
    await page.emulate(device);
    
    const viewport = page.viewport();
    
    console.log(
      `[emulate] Pixel 5: ${viewport.width}x${viewport.height}` +
      ` (dpr=${viewport.deviceScaleFactor}, mobile=${viewport.isMobile})`
    );
    
    await page.goto("https://www.mozilla.org");
    await browser.close();
    

    Output:

    [emulate] Pixel 5: 393x851 (dpr=3, mobile=true)

    Network Interception

    A common requirement for testing is to be able to track and intercept network requests. Interception is especially useful for avoiding requests to third party services during tests, and providing mock response data. It can also be used to handle HTTP authentication dialogs, and override parts of the request and response, for example adding or removing headers. In the example below we use network request interception to block all requests to web fonts on a page, which might be useful to ensure that these fonts failing to load doesn’t break the site layout.

    import puppeteer from "puppeteer";
    
    const browser = await puppeteer.launch({
      browser: 'firefox'
    });
    
    const page = await browser.newPage();
    await page.setRequestInterception(true);
    
    page.on("request", request => {
      if (request.url().includes(".woff2")) {
        // Block requests to custom user fonts.
        console.log(`[intercept] Request aborted: ${request.url()}`);
        request.abort();
      } else {
        request.continue();
      }
    });
    
    const response = await page.goto("https://support.mozilla.org");
    console.log(
      `[navigate] status=${response.status()} url=${response.url()}`
    );
    await browser.close();

    Output:

    [intercept] Request aborted: https://assets-prod.sumo.prod.webservices.mozgcp.net/static/Inter-Bold.3717db0be15085ac.woff2
    [navigate] status=200 url=https://support.mozilla.org/en-US/
    

    Preload Scripts

    Often automation tooling wants to provide custom functionality that can be implemented in JavaScript. Whilst WebDriver has always allowed injecting scripts, it wasn’t possible to ensure that an injected script was always run before the page started loading, making it impossible to avoid races between the page scripts and the injected script.

    WebDriver BiDi provides “preload” scripts which can be run before a page is loaded. It also provides a means to emit custom events from scripts. This can be used, for example, to avoid polling for expected elements, but instead using a mutation observer that fires as soon as the element is available. In the example below we wait for the <title> element to appear on the page, and log its contents.

    import puppeteer from "puppeteer";
    
    const browser = await puppeteer.launch({
      browser: 'firefox',
    });
    
    const page = await browser.newPage();
    
    const gotMessage = new Promise(resolve =>
      page.exposeFunction("sendMessage", async message => {
        console.log(`[script] Message from pre-load script: ${message}`);
        resolve();
      })
    );
    
    await page.evaluateOnNewDocument(() => {
      const observer = new MutationObserver(mutationList => {
        for (const mutation of mutationList) {
          if (mutation.type === "childList") {
            for (const node of mutation.addedNodes) {
              if (node.tagName === "TITLE") {
                sendMessage(node.textContent);
              }
            }
          }
        };
      });
    
      observer.observe(document.documentElement, {
        subtree: true,
        childList: true,
      });
    });
    
    await page.goto("https://support.mozilla.org");
    await gotMessage;
    await browser.close();

    Output:

    [script] Message from pre-load script: Mozilla Support

    Technical Background

    Until recently people wishing to automate browsers had two main choices:

    • Use the W3C WebDriver API, which was based on earlier work by the Selenium project.
    • Use a browser-specific API for talking to each supported browser such as Chrome DevTools Protocol (CDP) for Chromium-based browsers, or Firefox’s Remote Debugging Protocol (RDP) for Gecko-based browsers.

    Unfortunately both of those options come with significant tradeoffs. The “classic” WebDriver API is HTTP-based, and its model involves automation sending a command to the browser and waiting for a response. That works well for automation scenarios where you load a page and then verify, for example, that some element is displayed, but the inability to get events ­— e.g. console logs — back from the browser, or run multiple commands concurrently, makes the API a poor fit for more advanced use cases.

    By contrast, browser-specific APIs have generally been designed around supporting the complex use cases of in-browser devtools. This has given them a feature set far in advance of what’s possible using WebDriver, as they need to support use cases such as recording console logs, or network requests.

    Therefore, browser automation clients have been forced to make the choice between supporting many browsers using a single protocol and providing a limited feature set, or providing a richer feature set but having to implement multiple protocols to provide functionality separately for each supported browser. This obviously increased the cost and complexity of creating great cross-browser automation, which isn’t a good situation, especially when developers commonly cite cross-browser testing as one the main pain points in developing for the web.

    Long time developers might notice the analogy here to the situation with editors before the development of Language Server Protocol (LSP). At that time each text editor or IDE had to implement bespoke support for each different programming language. That made it hard to get support for a new language into all the tools that developers were using. The advent of LSP changed that by providing a common protocol that could be supported by any combination of editor and programming language. For a new programming language like TypeScript to be supported across all editors it no longer needs to get them to add support one-by-one; it only needs to provide an LSP server and it will automatically be supported across any LSP-supporting editor. The advent of this common protocol has also enabled things that were hard to imagine before. For example specific libraries like Tailwind getting their own LSP implementation to enable bespoke editor functionality.

    So to improve cross-browser automation we’ve taken a similar approach: developing WebDriver BiDi, which brings the automation featureset previously limited to browser-specific protocols to a standardized protocol that can be implemented by any browser and used by any automation tooling in any programming language.

    At Mozilla we see this strategy of standardizing protocols in order to remove barriers to entry, allow a diverse ecosystem of interoperable implementations to flourish, and enable users to choose those best suited to their needs as a key part of our manifesto and web vision.

    For more details about the design of WebDriver BiDi and how it relates to classic WebDriver, please see our earlier posts.

    Removing experimental CDP support in Firefox

    As part of our early work on improving cross-browser testing, we shipped a partial implementation of CDP, limited to a few commands and events needed to support testing use cases. This was previously the basis of experimental support for Firefox in Puppeteer. However, once it became clear that this was not the way forward for cross-browser automation, effort on this was stopped. As a result it is unmaintained and doesn’t work with modern Firefox features such as site isolation. Therefore support is scheduled to be removed at the end of 2024.

    If you are currently using CDP with Firefox, and don’t know how to transition to WebDriver BiDi, please reach out using one of the channels listed at the bottom of this post, and we will discuss your requirements.

    What’s Next?

    Although Firefox is now officially supported in Puppeteer, and has enough functionality to cover many automation and testing scenarios, there are still some APIs that remain unsupported. These broadly fall into three categories (consult the Puppeteer documentation for a full list):

    • Highly CDP-specific APIs, notably those in the CDPSession module. These are unlikely to be supported directly, but specific use cases that currently require these APIs could be candidates for standardization.
    • APIs which require further standards work. For example page.accessibility.snapshot returns a dump of the Chromium accessibility tree. However because there’s currently no standardized description of what that tree should look like this is hard to make work in a cross-browser way. There are also cases which are much more straightforward, as they only require work on the WebDriver BiDi spec itself; for example page.setGeolocation.
    • APIs which have a standard but are not yet implemented, for example the ability to execute scripts in workers required for commands like WebWorker.evaluate.

    We expect to fill these gaps going forward. To help prioritize, we’re interested in your feedback: Please try running your Puppeteer tests in Firefox! If you’re unable to get them in Firefox because of a bug or missing feature, please let us know using one of the methods below so that we can take it into account when planning our future standards and implementation work:

    • For Firefox implementation bugs, please file a bug on Bugzilla
    • If you’re confident that the issue is in Puppeteer, please file a bug in their issue tracker.
    • For features missing from the WebDriver BiDi specification, please file an issue on GitHub
    • If you want to talk to us about use cases or requirements, please use the #webdriver channel on Mozilla’s Matrix instance or email dev-webdriver@mozilla.org.

    The post Announcing Official Puppeteer Support for Firefox appeared first on Mozilla Hacks - the Web developer blog.

  • Mozilla Hacks hacks.mozilla.org browser mozilla standards technology web-dev web-development 2024-06-27 16:18
    ↗

    Process separation remains one of the most important parts of the Firefox security model and securing our IPC (Inter-Process Communication) interfaces is crucial to keep privileges in the different processes separated. We take a more detailed look at our newest tool for...

    Process separation is one of the cornerstones of the Firefox security model. Instead of running Firefox as a single process, multiple processes with different privileges communicate with each other via Inter-Process Communication (IPC). For example: loading a website, processing its resources, and rendering it is done by an isolated Content Process with a very restrictive sandbox, whereas critical operations such as file system access are only allowed to be executed in the Parent Process.

    By running potentially harmful code with lower privileges, the impact of a potential code execution vulnerability is mitigated. In order to gain full control, the attacker now needs to find a second vulnerability that allows bypassing these privilege restrictions – which is colloquially known as a “sandbox escape”.

    In order to achieve a sandbox escape, an attacker essentially has two options: The first one is to directly attack the underlying operating system from within the compromised content process. Since every process needs to interact with the operating system for various tasks, an attacker can focus on finding bugs in these interfaces to elevate privileges.

    Since we have already deployed changes to Firefox that severely limit the OS interfaces exposed to low-privilege processes, the second attack option becomes more interesting: Exploiting bugs in privileged IPC endpoints. Since low privilege content processes need to interact with the privileged parent process, the parent needs to expose certain interfaces.

    If these interfaces do not perform the necessary security checks or contain memory safety errors, the content process might be able to exploit them and perform actions with higher privileges, possibly leading to an entire parent process takeover.

    Traditionally , fuzzing has had multiple success stories in the history of Mozilla and allowed us to find all sorts of problems including security vulnerabilities in our code. However, applying fuzzing to our critical IPC interfaces has historically always been difficult. This is primarily because IPC interfaces cannot be tested in isolation, i.e. require the full browser for testing, and because incorrect usage of IPC interfaces can force browser restarts which introduce a prohibitive amount of latency between iterations.

    To find a solution to this challenge, we engaged with the research community to apply a new method of rewinding application state during fuzzing. We saw our first results with this approach in 2021 using an experimental prototype that would later become the open source snapshot fuzzing tool called “Nyx”.

    As of 2024, we are happy to announce that we are now running various snapshot fuzzing targets for IPC in production. Snapshot fuzzing is a new technology that has become more popular in recent years and we are proud of our role in bringing it from concept to practicality.

    Using this technology we have already been able to identify and fix a number of potential problems in our IPC layer and we will continue to improve our testing to provide you with the most secure version of Firefox.

    If you’d like to know more, or even consider contributing to Mozilla, check out our post on the security blog explaining the technical architecture behind this new tool.

    The post Snapshots for IPC Fuzzing appeared first on Mozilla Hacks - the Web developer blog.

  • Mozilla Hacks hacks.mozilla.org browser mozilla standards technology web-dev web-development 2024-06-25 15:25
    ↗

    Today we’re proud to announce the next Mozilla Builders project: sqlite-vec. Led by independent developer Alex Garcia, this project brings vector search functionality to the beloved SQLite embedded database. Alex has been working on this problem for a while, and we think his...

    Mozilla’s recently announced Builders program supports projects that advance the cause of open source AI. Our inaugural theme is “Local AI”: AI-powered applications that can run entirely locally on consumer devices like desktops, laptops, and smartphones. We are keenly interested in this area because it fosters greater privacy and control by putting AI technology directly into the hands of users. It also democratizes AI development by reducing costs, making powerful tools accessible to individual developers and small communities.

    As a part of Mozilla Builders, we’ve launched an accelerator that developers can apply to join, but in parallel we have also been proactively recruiting specific open source projects that we feel have the potential to move AI forward and would benefit from Mozilla’s investment, expertise, and support. Our first such Builders project is llamafile, led by open source developer Justine Tunney. llamafile makes open LLMs run fast on everyday consumer hardware while also making open source AI dramatically more accessible and usable.

    squilte vec logo

    Today we’re proud to announce the next Mozilla Builders project: sqlite-vec. Led by independent developer Alex Garcia, this project brings vector search functionality to the beloved SQLite embedded database.

    Alex has been working on this problem for a while, and we think his latest approach will have a great impact by providing application developers with a powerful new tool for building Local AI applications.

    alex garcia

    “I’m very excited for sqlite-vec to be a Mozilla Builders project”, said Alex Garcia. “I care a lot about building software that is easy to get started with and works everywhere, a trait obviously shared by other Builders projects like llamafile. AI tools are no exception — a vector database that runs everywhere means more equitable access for everyone.”

    Vector databases are emerging as a key component of the AI application stack, supporting uses like retrieval augmented generation (RAG) and semantic search. But few of today’s available databases are designed for on-device use, making it harder to offer functionality like RAG in Local AI apps. SQLite is a mature and widely-deployed embedded database – in fact, it’s even built-into Mozilla’s own Firefox web browser.

    The prospect of a vector-enabled SQLite opens up many new possibilities for locally-running AI applications. For example, imagine a chatbot that can answer questions about your personal data without letting a single byte of that data leave the privacy and safety of your laptop.

    We’re excited to be working with Alex and supporting his efforts on sqlite-vec. We encourage you to follow the project’s progress, and Alex welcomes your contributions. And Mozilla’s Discord server is a great place to connect with Alex, the Mozilla Builders team, and everyone else in our growing community of open source practitioners. Please stop by and introduce yourself.


    The post Sponsoring sqlite-vec to enable more powerful Local AI applications appeared first on Mozilla Hacks - the Web developer blog.

  • Mozilla Hacks hacks.mozilla.org browser mozilla standards technology web-dev web-development 2024-05-31 16:43
    ↗

    Firefox 130 will introduce an experimental new capability to automatically generate alt-text for images using a fully private on-device AI model. The feature will be available as part of Firefox’s built-in PDF editor, and our end goal is to make it available in general...

    As discussed on Mozilla Connect, Firefox 130 will introduce an experimental new capability to automatically generate alt-text for images using a fully private on-device AI model. The feature will be available as part of Firefox’s built-in PDF editor, and our end goal is to make it available in general browsing for users with screen readers.

    Why alt text?

    Web pages have a fundamentally simple structure, with semantics that allow the browser to interpret the same content differently for different people based on their own needs and preferences. This is a big part of what we think makes the Web special, and what enables the browser to act as a user agent, responsible for making the Web work for people.

    This is particularly useful for assistive technology such as screen readers, which are able to work alongside browser features to reduce obstacles for people to access and exchange information. For static web pages, this generally can be accomplished with very little interaction from the site, and this access has been enormously beneficial to many people.

    But even for a simple static page there are certain types of information, like alternative text for images, that must be provided by the author to provide an understandable experience for people using assistive technology (as required by the spec). Unfortunately, many authors don’t do this: the Web Almanac reported in 2022 that nearly half of images were missing alt text.

    Until recently it’s not been feasible for the browser to infer reasonably high quality alt text for images, without sending potentially sensitive data to a remote server. However, latest developments in AI have enabled this type of image analysis to happen efficiently, even on a CPU.

    We are adding a feature within the PDF editor in Firefox Nightly to validate this approach. As we develop it further and learn from the deployment, our goal is to offer it for users who’d like to use it when browsing to help them better understand images which would otherwise be inaccessible.

    Generating alt text with small open source models

    We are using Transformer-based machine learning models to describe images. These models are getting good at describing the contents of the image, yet are compact enough to operate on devices with limited resources. While can’t outperform a large language model like GPT-4 Turbo with Vision, or LLaVA, they are sufficiently accurate to provide valuable insights on-device across a diversity of hardware.

    Model architectures like BLIP or even VIT that were trained on datasets like COCO (Common Object In Context) or Flickr30k are good at identifying objects in an image. When combined with a text decoder like OpenAI’s GPT-2, they can produce alternative text with 200M or fewer parameters. Once quantized, these models can be under 200MB on disk, and run in a couple of seconds on a laptop – a big reduction compared to the gigabytes and resources an LLM requires.

    Example Output

    The image below (pulled from the COCO dataset) is described by:

    • FIREFOX – our 182M parameters model using a Distilled version of GPT-2 alongside a Vision Transformer (ViT) image encoder.
    • BASELINE MODEL – a slightly bigger ViT+GPT-2 model
    • HUMAN TEXT – the description provided by the dataset annotator.


    A person is standing in front of a cake with candles.

    Both small models lose accuracy compared to the description provided by a person, and the baseline model is confused by the hands position. The Firefox model is doing slightly better in that case, and captures what is important.

    What matters can be suggestive in any case. Notice how the person did not write about the office settings or the cherries on the cake, and specified that the candles were long.

    If we run the same image on a model like GPT-4o, the results are extremely detailed:

    The image depicts a group of people gathered around a cake with lit candles. The focus is on the cake, which has a red jelly topping and a couple of cherries. There are several lit candles in the foreground. In the background, there is a woman smiling, wearing a gray turtleneck sweater, and a few other people can be seen, likely in an office or indoor setting. The image conveys a celebratory atmosphere, possibly a birthday or a special occasion.

    But such level of detail in alt text is overwhelming and doesn’t prioritize the most important information. Brevity is not the only goal, but it’s a helpful starting point, and pithy accuracy in a first draft allows content creators to focus their edits on missing context and details.

    So if we ask the LLM for a one-sentence description, we get:

    A group of people in an office celebrates with a lit birthday cake in the foreground and a smiling woman in the background.

    This has more detail than our small model, but can’t be run locally without sending your image to a server.

    Small is beautiful

    Running inference locally with small models offers many advantages:

    1. Privacy: All operations are contained within the device, ensuring data privacy. We won’t have access to your images, PDF content, generated captions, or final captions. Your data will not be used to train the model.
    2. Resource Efficiency: Small models eliminate the need for high-powered GPUs in the cloud, reducing resource consumption and making it more environmentally friendly.
    3. Increased Transparency: In-house management of models allows for direct oversight of the training datasets, offering more transparency compared to some large language models (LLMs).
    4. Carbon Footprint Monitoring: Training models in-house facilitates precise tracking of CO2 emissions using tools such as CodeCarbon.
    5. Ease of Improvement: Since retraining can be completed in less than a day on a single piece of hardware, it allows for frequent updates and enhancements of the model.

    Integrating Local Inference into Firefox

    Extending the Translations inference architecture

    Firefox Translations uses the Bergamot project powered by the Marian C++  inference runtime. The runtime is compiled into WASM, and there’s a model file for each translation task.

    For example, if you run Firefox in French and visit an English page, Firefox will ask if you want to translate it to French and download the English-to-French model (~20MiB) alongside the inference runtime. This is a one-shot download: translations will happen completely offline once those files are on disk.

    The WASM runtime and models are both stored in the Firefox Remote Settings service, which allows us to distribute them at scale and manage versions.

    The inference task runs in a separate process, which prevents the browser or one of its tabs from crashing if the inference runtime crashes.

    ONNX and Transformers.js

    We’ve decided to embed the ONNX runtime in Firefox Nightly along with the Transformers.js library to extend the translation architecture to perform different inference work.

    Like Bergamot, the ONNX runtime has a WASM distribution and can run directly into the browser. The ONNX project has recently introduced WebGPU support, which will eventually be activated in Firefox Nightly for this feature.

    Transformers.js provides a Javascript layer on top of the ONNX inference runtime, making it easy to add inference for a huge list of model architectures. The API mimics the very popular Python library. It does all the tedious work of preparing the data that is passed to the runtime and converting the output back to a usable result. It also deals with downloading models from Hugging Face and caching them.

    From the project’s documentation, this is how you can run a sentiment analysis model on a text:

    import { pipeline } from '@xenova/transformers';
    
    // Allocate a pipeline for sentiment-analysis
    let pipe = await pipeline('sentiment-analysis');
    let out = await pipe('I love transformers!');
    
    // [{'label': 'POSITIVE', 'score': 0.999817686}]

    Using Transformers.js gives us confidence when trying out a new model with ONNX. If its architecture is listed in the Transformers.js documentation, that’s a good indication it will work for us.

    To vendor it into Firefox Nightly, we’ve slightly changed its release to distribute ONNX separately from Transformers.js, dropped Node.js-related pieces, and fixed those annoying eval() calls the ONNX library ships with. You can find the build script here which was used to populate that vendor directory.

    From there, we reused the Translation architecture to run the ONNX runtime inside its own process, and have Transformers.js run with a custom model cache system.

    Model caching

    The Transformers.js project can use local and remote models and has a caching mechanism using the browser cache. Since we are running inference in an isolated web worker, we don’t want to provide access to the file system or store models inside the browser cache. We also don’t want to use Hugging Face as the model hub in Firefox, and want to serve model files from our own servers.

    Since Transformers.js provides a callback for a custom cache, we have implemented a specific model caching layer that downloads files from our own servers and caches them in IndexedDB.

    As the project grows, we anticipate the browser will store more models, which can take up significant space on disk. We plan to add an interface in Firefox to manage downloaded models so our users can list them and remove some if needed.

    Fine-tuning a ViT + GPT-2 model

    Ankur Kumar released a popular model on Hugging Face to generate alt text for images and blogged about it. This model was also published as ONNX weights by Joshua Lochner so it could be used in Transformers.js, see https://huggingface.co/Xenova/vit-gpt2-image-captioning

    The model is doing a good job – even if in some cases we had better results with https://huggingface.co/microsoft/git-base-coco – But the GIT architecture is not yet supported in ONNX converters, and with less than 200M params, most of the accuracy is obtained by focusing on good training data. So we have picked ViT for our first model.

    Ankur used the google/vit-base-patch16-224-in21k image encoder and the GPT-2 text decoder and fine-tuned them using the COCO dataset, which is a dataset of over 120k labeled images.

    In order to reduce the model size and speed it up a little bit, we’ve decided to replace GPT-2 with DistilGPT-2 — which is 2 times faster and 33% smaller according to its documentation.

    Using that model in Transformers.js gave good results (see the training code at GitHub – mozilla/distilvit: image-to-text model for PDF.js).

    We further improved the model for our use case with an updated training dataset and some supervised learning to simplify the output and mitigate some of the biases common in image to text models.

    Alt text generation in PDF.js

    Firefox is able to add an image in a PDF using our popular open source pdf.js library:

    A screenshot of the PDF.js alt text modal window

    Starting in Firefox 130, we will automatically generate an alt text and let the user validate it. So every time an image is added, we get an array of pixels we pass to the ML engine and a few seconds after, we get a string corresponding to a description of this image (see the code).

    The first time the user adds an image, they’ll have to wait a bit for downloading the model (which can take up to a few minutes depending on your connection) but the subsequent uses will be much faster since the model will be stored locally.

    In the future, we want to be able to provide an alt text for any existing image in PDFs, except images which just contain text (it’s usually the case for PDFs containing scanned books).

    Next steps

    Our alt text generator is far from perfect, but we want to take an iterative approach and improve it in the open. The inference engine has already landed in Firefox Nightly as a new ml component along with an initial documentation page.

    We are currently working on improving the image-to-text datasets and model with what we’ve described in this blog post, which will be continuously updated on our Hugging Face page.

    The code that produces the model lives in Github https://github.com/mozilla/distilvit and the web application we’re building for our team to improve the model is located at https://github.com/mozilla/checkvite. We want to make sure the models and datasets we build, and all the code used, are made available to the community.

    Once the alt text feature in PDF.js has matured and proven to work well, we hope to make the feature available in general browsing for users with screen readers.

    The post Experimenting with local alt text generation in Firefox Nightly appeared first on Mozilla Hacks - the Web developer blog.

  • Mozilla Hacks hacks.mozilla.org browser mozilla standards technology web-dev web-development 2024-04-25 15:34
    ↗

    When Mozilla’s Innovation group first launched the llamafile project late last year, we were thrilled by the immediate positive response from open source AI developers. It’s become one of Mozilla’s top three most-favorited repositories on GitHub, attracting a number of...

    When Mozilla’s Innovation group first launched the llamafile project late last year, we were thrilled by the immediate positive response from open source AI developers. It’s become one of Mozilla’s top three most-favorited repositories on GitHub, attracting a number of contributors, some excellent PRs, and a growing community on our Discord server.

    Through it all, lead developer and project visionary Justine Tunney has remained hard at work on a wide variety of fundamental improvements to the project. Just last night, Justine shipped the v0.8 release of llamafile, which includes not only support for the very latest open models, but also a number of big performance improvements for CPU inference.

    As a result of Justine’s work, today llamafile is both the easiest and fastest way to run a wide range of open large language models on your own hardware. See for yourself: with llamafile, you can run Meta’s just-released LLaMA 3 model–which rivals the very best models available in its size class–on an everyday Macbook.

    How did we do it? To explain that, let’s take a step back and tell you about everything that’s changed since v0.1.

    tinyBLAS: democratizing GPU support for NVIDIA and AMD

    llamafile is built atop the now-legendary llama.cpp project. llama.cpp supports GPU-accelerated inference for NVIDIA processors via the cuBLAS linear algebra library, but that requires users to install NVIDIA’s CUDA SDK. We felt uncomfortable with that fact, because it conflicts with our project goal of building a fully open-source and transparent AI stack that anyone can run on commodity hardware. And besides, getting CUDA set up correctly can be a bear on some systems. There had to be a better way.

    With the community’s help (here’s looking at you, @ahgamut and @mrdomino!), we created our own solution: it’s called tinyBLAS, and it’s llamafile’s brand-new and highly efficient linear algebra library. tinyBLAS makes NVIDIA acceleration simple and seamless for llamafile users. On Windows, you don’t even need to install CUDA at all; all you need is the display driver you’ve probably already installed.

    But tinyBLAS is about more than just NVIDIA: it supports AMD GPUs, as well. This is no small feat. While AMD commands a respectable 20% of today’s GPU market, poor software and driver support have historically made them a secondary player in the machine learning space. That’s a shame, given that AMD’s GPUs offer high performance, are price competitive, and are widely available.

    One of llamafile’s goals is to democratize access to open source AI technology, and that means getting AMD a seat at the table. That’s exactly what we’ve done: with llamafile’s tinyBLAS, you can now easily make full use of your AMD GPU to accelerate local inference. And, as with CUDA, if you’re a Windows user you don’t even have to install AMD’s ROCm SDK.

    All of this means that, for many users, llamafile will automatically use your GPU right out of the box, with little to no effort on your part.

    CPU performance gains for faster local AI

    Here at Mozilla, we are keenly interested in the promise of “local AI,” in which AI models and applications run directly on end-user hardware instead of in the cloud. Local AI is exciting because it opens up the possibility of more user control over these systems and greater privacy and security for users.

    But many consumer devices lack the high-end GPUs that are often required for inference tasks. llama.cpp has been a game-changer in this regard because it makes local inference both possible and usably performant on CPUs instead of just GPUs. 

    Justine’s recent work on llamafile has now pushed the state of the art even further. As documented in her detailed blog post on the subject, by writing 84 new matrix multiplication kernels she was able to increase llamafile’s prompt evaluation performance by an astonishing 10x compared to our previous release. This is a substantial and impactful step forward in the quest to make local AI viable on consumer hardware.

    This work is also a great example of our commitment to the open source AI community. After completing this work we immediately submitted a PR to upstream these performance improvements to llama.cpp. This was just the latest of a number of enhancements we’ve contributed back to llama.cpp, a practice we plan to continue.

    Raspberry Pi performance gains

    Speaking of consumer hardware, there are few examples that are both more interesting and more humble than the beloved Raspberry Pi. For a bargain basement price, you get a full-featured computer running Linux with plenty of computing power for typical desktop uses. It’s an impressive package, but historically it hasn’t been considered a viable platform for AI applications.

    Not any more. llamafile has now been optimized for the latest model (the Raspberry Pi 5), and the result is that a number of small LLMs–such as Rocket-3B (download), TinyLLaMA-1.5B (download), and Phi-2 (download)–run at usable speeds on one of the least expensive computers available today. We’ve seen prompt evaluation speeds of up to 80 tokens/sec in some cases!

    Keeping up with the latest models

    The pace of progress in the open model space has been stunningly fast. Over the past few months, hundreds of models have been released or updated via fine-tuning. Along the way, there has been a clear trend of ever-increasing model performance and ever-smaller model sizes.

    The llama.cpp project has been doing an excellent job of keeping up with all of these new models, frequently rolling-out support for new architectures and model features within days of their release.

    For our part we’ve been keeping llamafile closely synced with llama.cpp so that we can support all the same models. Given the complexity of both projects, this has been no small feat, so we’re lucky to have Justine on the case.

    Today, you can today use the very latest and most capable open models with llamafile thanks to her hard work. For example, we were able to roll-out llamafiles for Meta’s newest LLaMA 3 models–8B-Instruct and 70B-Instruct–within a day of their release. With yesterday’s 0.8 release, llamafile can also run Grok, Mixtral 8x22B, and Command-R.

    Creating your own llamafiles

    Since the day that llamafile shipped people have wanted to create their own llamafiles. Previously, this required a number of steps, but today you can do it with a single command, e.g.:

    llamafile-convert [model.gguf]

    In just moments, this will produce a “model.llamafile” file that is ready for immediate use. Our thanks to community member @chan1012 for contributing this helpful improvement.

    In a related development, Hugging Face recently added official support for llamafile within their model hub. This means you can now search and filter Hugging Face specifically for llamafiles created and distributed by other people in the open source community.

    OpenAI-compatible API server

    Since it’s built on top of llama.cpp, llamafile inherits that project’s server component, which provides OpenAI-compatible API endpoints. This enables developers who are building on top of OpenAI to switch to using open models instead. At Mozilla we very much want to support this kind of future: one where open-source AI is a viable alternative to centralized, closed, commercial offerings.

    While open models do not yet fully rival the capabilities of closed models, they’re making rapid progress. We believe that making it easier to pivot existing code over to executing against open models will increase demand and further fuel this progress.

    Over the past few months, we’ve invested effort in extending these endpoints, both to increase functionality and improve compatibility. Today, llamafile can serve as a drop-in replacement for OpenAI in a wide variety of use cases.

    We want to further extend our API server’s capabilities, and we’re eager to hear what developers want and need. What’s holding you back from using open models? What features, capabilities, or tools do you need? Let us know!

    Integrations with other open source AI projects

    Finally, it’s been a delight to see llamafile adopted by independent developers and integrated into leading open source AI projects (like Open Interpreter). Kudos in particular to our own Kate Silverstein who landed PRs that add llamafile support to LangChain and LlamaIndex (with AutoGPT coming soon).

    If you’re a maintainer or contributor to an open source AI project that you feel would benefit from llamafile integration, let us know how we can help.

    Join us!

    The llamafile project is just getting started, and it’s also only the first step in a major new initiative on Mozilla’s part to contribute to and participate in the open source AI community. We’ll have more to share about that soon, but for now: I invite you to join us on the llamafile project!

    The best place to connect with both the llamafile team at Mozilla and the overall llamafile community is over at our Discord server, which has a dedicated channel just for llamafile. And of course, your enhancement requests, issues, and PRs are always welcome over at our GitHub repo.

    I hope you’ll join us. The next few months are going to be even more interesting and unexpected than the last, both for llamafile and for open source AI itself.


    The post Llamafile’s progress, four months in appeared first on Mozilla Hacks - the Web developer blog.

  • Mozilla Hacks hacks.mozilla.org browser mozilla standards technology web-dev web-development 2024-04-23 19:08
    ↗

    In this blog post, we delve into the motivations for choosing Rust for our crash reporter, outline the unique challenges of designing an application that operates when the main browser has failed, and discuss the new architecture we've implemented. We also share insights into...

    Firefox’s crash reporter is hopefully not something that most users experience often. However, it is still a very important component of Firefox, as it is integral in providing insight into the most visible bugs: those which crash the main process. These bugs offer the worst user experience (since the entire application must close), so fixing them is a very high priority. Other types of crashes, such as content (tab) crashes, can be handled by the browser and reported gracefully, sometimes without the user being aware that an issue occurred at all. But when the main browser process comes to a halt, we need another separate application to gather information about the crash and interact with the user.

    This post details the approach we have taken to rewrite the crash reporter in Rust. We discuss the reasoning behind this rewrite, what makes the crash reporter a unique application, the architecture we used, and some details of the implementation.

    Why Rewrite?

    Even though it is important to properly handle main process crashes, the crash reporter hasn’t received significant development in a while (aside from development to ensure that crash reports and telemetry continue to reliably be delivered)! It has long been stuck in a local maximum of “good enough” and “scary to maintain”: it features 3 individual GUI implementations (for Windows, GTK+ for Linux, and macOS), glue code abstracting a few things (mostly in C++, and Objective-C for macOS), a binary blob produced by obsoleted Apple development tools, and no test suite. Because of this, there is a backlog of features and improvements which haven’t been acted on.

    We’ve recently had a number of successful pushes to decrease crash rates (including both big leaps and many small bug fixes), and the crash reporter has functioned well enough for our needs during this time. However, we’ve reached an inflection point where improving the crash reporter would provide valuable insight to enable us to decrease the crash rate even further. For the reasons previously mentioned, improving the current codebase is difficult and error-prone, so we deemed it appropriate to rewrite the application so we can more easily act on the feature backlog and improve crash reports.

    Like many components of Firefox, we decided to use Rust for this rewrite to produce a more reliable and maintainable program. Besides the often-touted memory safety built into Rust, its type system and standard library make reasoning about code, handling errors, and developing cross-platform applications far more robust and comprehensive.

    Crash Reporting is an Edge Case

    There are a number of features of the crash reporter which make it quite unique, especially compared to other components which have been ported to Rust. For one thing, it is a standalone, individual program; basically no other components of Firefox are used in this way. Firefox itself launches many processes as a means of sandboxing and insulating against crashes, however these processes all talk to one another and have access to the same code base.

    The crash reporter has a very unique requirement: it must use as little as possible of the Firefox code base, ideally none! We don’t want it to rely on code which may be buggy and cause the reporter itself to crash. Using a completely independent implementation ensures that when a main process crash does occur, the cause of that crash won’t affect the reporter’s functionality as well.

    The crash reporter also necessarily has a GUI. This alone may not separate it from other Firefox components, but we can’t leverage any of the cross-platform rendering goodness that Firefox provides! So we need to implement a cross-platform GUI independent of Firefox as well. You might think we could reach for an existing cross-platform GUI crate, however we have a few reasons not to do so.

    • We want to minimize the use of external code: to improve crash reporter reliability (which is paramount), we want it to be as simple and auditable as possible.
    • Firefox vendors all dependencies in-tree, so we are hesitant to bring in large dependencies (GUI libraries are likely pretty sizable).
    • There are only a few third-party crates that provide a native OS look and feel (or actually use native GUI APIs): it’s desirable for the crash reporter to have a native feel to be familiar to users and take advantage of accessibility features.

    So all of this is to say that third-party cross-platform GUI libraries aren’t a favorable option.

    These requirements significantly narrow the approach that can be used.

    Building a GUI View Abstraction

    In order to make the crash reporter more maintainable (and make it easier to add new features in the future), we want to have as minimal and generic platform-specific code as possible. We can achieve this by using a simple UI model that can be converted into native GUI code for each platform. Each UI implementation will need to provide two methods (over arbitrary platform-specific &self data):

    /// Run a UI loop, displaying all windows of the application until it terminates.
    fn run_loop(&self, app: model::Application)
    
    /// Invoke a function asynchronously on the UI loop thread.
    fn invoke(&self, f: model::InvokeFn)
    

    The run_loop function is pretty self-explanatory: the UI implementation takes an Application model (which we’ll discuss shortly) and runs the application, blocking until the application is complete. Conveniently, our target platforms generally have similar assumptions around threading: the UI runs in a single thread and typically runs an event loop which blocks on new events until an event signaling the end of the application is received.

    There are some cases where we’ll need to run a function on the UI thread asynchronously (like displaying a window, updating a text field, etc). Since run_loop blocks, we need the invoke method to define how to do this. This threading model will make it easy to use the platform GUI frameworks: everything calling native functions will occur on a single thread (the main thread in fact) for the duration of the program.

    This is a good time to be a bit more specific about exactly what each UI implementation will look like. We’ll discuss pain points for each later on. There are 4 UI implementations:

    • A Windows implementation using the Win32 API.
    • A macOS implementation using Cocoa (AppKit and Foundation frameworks).
    • A Linux implementation using GTK+ 3 (the “+” has since been dropped in GTK 4, so henceforth I’ll refer to it as “GTK”). Linux doesn’t provide its own GUI primitives, and we already ship GTK with Firefox on Linux to make a modern-feeling GUI, so we can use it for the crash reporter, too. Note that some platforms that aren’t directly supported by Mozilla (like BSDs) use the GTK implementation as well.
    • A testing implementation which will allow tests to hook into a virtual UI and poke things (to simulate interactions and read state).

    One last detail before we dive in: the crash reporter (at least right now) has a pretty simple GUI. Because of this, an explicit non-goal of the development was to create a separate Rust GUI crate. We wanted to create just enough of an abstraction to cover the cases we needed in the crash reporter. If we need more controls in the future, we can add them to the abstraction, but we avoided spending extra cycles to fill out every GUI use case.

    Likewise, we tried to avoid unnecessary development by allowing some tolerance for hacks and built-in edge cases. For example, our model defines a Button as an element which contains an arbitrary element, but actually supporting that with Win32 or AppKit would have required a lot of custom code, so we special case on a Button containing a Label (which is all we need right now, and an easy primitive available to us). I’m happy to say there aren’t really many special cases like that at all, but we are comfortable with the few that were needed.

    The UI Model

    Our model is a declarative structuring of concepts mostly present in GTK. Since GTK is a mature library with proven high-level UI concepts, this made it appropriate for our abstraction and made the GTK implementation pretty simple. For instance, the simplest way that GTK does layout (using container GUI elements and per-element margins/alignments) is good enough for our GUI, so we use similar definitions in the model. Notably, this “simple” layout definition is actually somewhat high-level and complicates the macOS and Windows implementations a bit (but this tradeoff is worth the ease of creating UI models).

    The top-level type of our UI model is Application. This is pretty simple: we define an Application as a set of top-level Windows (though our application only has one) and whether the current locale is right-to-left. We inspect Firefox resources to use the same locale that Firefox would, so we don’t rely on the native GUI’s locale settings.

    As you might expect, each Window contains a single root element. The rest of the model is made up of a handful of typical container and primitive GUI elements:

    A class diagram showing the inheritance structure. An Application contains one or more Windows. A Window contains one Element. An Element is subclassed to Checkbox, Label, Progress, TextBox, Button, Scroll, HBox, and VBox types.

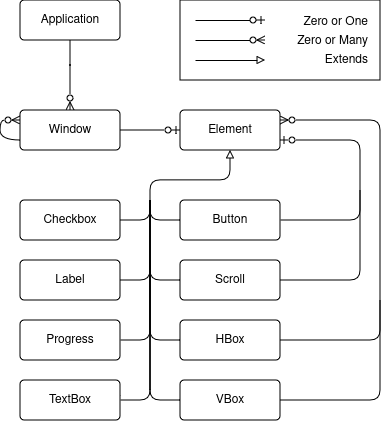
    The crash reporter only needs 8 types of GUI elements! And really, Progress is used as a spinner rather than indicating any real progress as of right now, so it’s not strictly necessary (but nice to show).

    Rust does not explicitly support the object-oriented concept of inheritance, so you might be wondering how each GUI element “extends” Element. The relationship represented in the picture is somewhat abstract; the implemented Element looks like:

    pub struct Element {
        pub style: ElementStyle,
        pub element_type: ElementType
    }
    

    where ElementStyle contains all the common properties of elements (alignment, size, margin, visibility, and enabled state), and ElementType is an enum containing each of the specific GUI elements as variants.

    Building the Model

    The model elements are all intended to be consumed by the UI implementations; as such, almost all of the fields have public visibility. However, as a means of having a separate interface for building elements, we define an ElementBuilder<T> type. This type has methods that maintain assertions and provide convenience setters. For instance, many methods accept parameters that are impl Into<MemberType>, some methods like margin() set multiple values (but you can be more specific with margin_top()), etc.

    There is a general impl<T> ElementBuilder<T> which provides setters for the various ElementStyle properties, and then each specific element type can also provide their own impl ElementBuilder<SpecificElement> with additional properties unique to the element type.

    We combine ElementBuilder<T> with the final piece of the puzzle: a ui! macro. This macro allows us to write our UI in a declarative manner. For example, it allows us to write:

    let details_window = ui! {
        Window title("Crash Details") visible(show_details) modal(true) hsize(600) vsize(400)
             halign(Alignment::Fill) valign(Alignment::Fill)
        {
             VBox margin(10) spacing(10) halign(Alignment::Fill) valign(Alignment::Fill) {
                	Scroll halign(Alignment::Fill) valign(Alignment::Fill) {
                    	TextBox content(details) halign(Alignment::Fill) valign(Alignment::Fill)
                	},
                	Button halign(Alignment::End) on_click(move || *show_details.borrow_mut() = false)
                 {
                     Label text("Ok")
                 }
             }
         }
    };
    

    The implementation of ui! is fairly simple. The first identifier provides the element type and an ElementBuilder<T> is created. After that, the remaining method-call-like syntax forms are called on the builder (which is mutable).

    Optionally, a final set of curly braces indicate that the element has children. In that case, the macro is recursively called to create them, and add_child is called on the builder with the result (so we just need to make sure a builder has an add_child method). Ultimately the syntax transformation is pretty simple, but I believe that this macro is a little bit more than just syntax sugar: it makes reading and editing the UI a fair bit clearer, since the hierarchy of elements is represented in the syntax. Unfortunately a downside is that there’s no way to support automatic formatting of such macro DSLs, so developers will need to maintain a sane formatting.

    So now we have a model defined and a declarative way of building it. But we haven’t discussed any dynamic runtime behaviors here. In the above example, we see an on_click handler being set on a Button. We also see things like the Window’s visible property being set to a show_details value which is changed when on_click is pressed. We hook into this declarative UI to change or react to events at runtime using a set of simple data binding primitives with which UI implementations can interact.

    Many GUI frameworks nowadays (both for Rust and other languages) have been built with the “diffing element trees” architecture (think React), where your code is (at least mostly) functional and side-effect-free and produces the GUI view as a function of the current state. This approach has its tradeoffs: for instance, it makes complicated, stateful alterations of the layout very simple to write, understand, and maintain, and encourages a clean separation of model and view! However since we aren’t writing a framework, and our application is and will remain fairly simple, the benefits of such an architecture were not worth the additional development burden. Our implementation is more similar to the MVVM architecture:

    • the model is, well, the model discussed here;
    • the views are the various UI implementations; and
    • the viewmodel is (loosely, if you squint) the collection of data bindings.

    Data Binding

    There are a few types which we use to declare dynamic (runtime-changeable) values. In our UI, we needed to support a few different behaviors:

    • triggering events, i.e., what happens when a button is clicked,
    • synchronized values which will mirror and notify of changes to all clones, and
    • on-demand values which can be queried for the current value.

    On-demand values are used to get textbox contents rather than using a synchronized value, in an effort to avoid implementing debouncing in each UI. It may not be terribly difficult to do so, but it also wasn’t difficult to support the on-demand implementation.

    As a means of convenience, we created a Property type which encompasses the value-oriented fields as well. A Property<T> can be set to either a static value (T), a synchronized value (Synchronized<T>), or an on-demand value (OnDemand<T>). It supports an impl From for each of these, so that builder methods can look like fn my_method(&mut self, value: impl Into<Property<T>>) allowing any supported value to be passed in a UI declaration.

    We won’t discuss the implementation in depth (it’s what you’d expect), but it’s worth noting that these are all Clone to easily share the data bindings: they use Rc (we don’t need thread safety) and RefCell as necessary to access callbacks.

    In the example from the last section, show_details is a Synchronized<bool> value. When it changes, the UI implementations change the associated window visibility. The Button on_click callback sets the synchronized value to false, hiding the window (note that the details window used in this example is never closed, it is just shown and hidden).

    In a former iteration, data binding types had a lifetime parameter which specified the lifetime for which event callbacks were valid. While we were able to make this work, it greatly complicated the code, especially because there’s no way to communicate the correct covariance of the lifetime to the compiler, so there was additional unsafe code transmuting lifetimes (though it was contained as an implementation detail). These lifetimes were also infectious, requiring some of the complicated semantics regarding their safety to be propagated into the model types which stored Property fields.

    Much of this was to avoid cloning values into the callbacks, but changing these types to all be Clone and store static-lifetime callbacks was worth making the code far more maintainable.

    Threading and Thread Safety

    The careful reader might remember that we discussed how our threading model involves interacting with the UI implementations only on the main thread. This includes updating the data bindings, since the UI implementations might have registered callbacks on them! While we could run everything in the main thread, it’s generally a much better experience to do as much off of the UI thread as possible, even if we don’t do much that’s blocking (though we will be blocking when we send crash reports). We want our business logic to default to being off of the main thread so that the UI doesn’t ever freeze. We can guarantee this with some careful design.

    The simplest way to guarantee this behavior is to put all of the business logic in one (non-Clone, non-Sync) type (let’s call it Logic) and construct the UI and UI state (like Property values) in another type (let’s call it UI). We can then move the Logic value into a separate thread to guarantee that UI can’t interact with Logic directly, and vice versa. Of course we do need to communicate sometimes! But we want to ensure that this communication will always be delegated to the thread which owns the values (rather than the values directly interacting with each other).

    We can accomplish this by creating an enqueuing function for each type and storing that in the opposite type. Such a function will be passed boxed functions to run on the owning thread that get a reference to the owned type (e.g., Box<dyn FnOnce(&T) + Send + 'static>). This is simple to create: for the UI thread, it is just the UI implementation’s invoke method which we briefly discussed previously. The Logic thread does nothing but run a loop which will get these functions and run them on the owned value (we just enqueue and pass them using an mpsc::channel). Now each type can asynchronously call methods on the other with the guarantee that they’ll be run on the correct thread.

    In a former iteration, a more complicated scheme was used with thread-local storage and a central type which was responsible for both creating threads and delegating the functions. But with such a basic use case as two threads delegating between each other, we were able to distill this to the essential aspects needed, greatly simplifying the code.
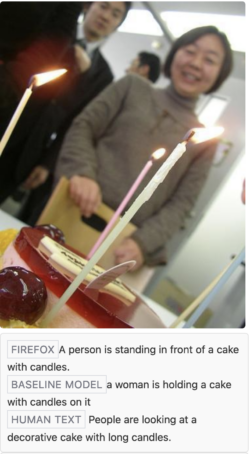
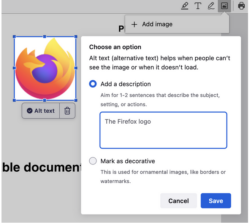
    Localization

    One nice benefit of this rewrite is that we could bring the localization of the crash reporter up to speed with our modern tooling. In almost every other part of Firefox, we use fluent to handle localization. Using fluent in the crash reporter makes the experience of localizers more uniform and predictable; they do not need to understand more than one localization system (the crash reporter was one of the last holdouts of the old system). It was very easy to use in the new code, with just a bit of extra code to extract the localization files from the Firefox installation when the crash reporter is run. In the worst case scenario where we can’t find or access these files, we have the en-US definitions directly bundled in the crash reporter binary.

    The UI Implementations

    We won’t go into much detail about the implementations, but it’s worth talking about each a bit.

    Linux (GTK)

    The GTK implementation is probably the most straightforward and succinct. We use bindgen to generate Rust bindings to the GTK functions we need (avoiding vendoring any external crates). Then we simply call all of the corresponding GTK functions to set up the GTK widgets as described in the model (remember, the model was made to mirror some of the GTK concepts).

    Since GTK is somewhat modern and meant to be written by humans (not automated tools like some of the other platforms), there weren’t really any pain points or unusual behaviors that needed to be addressed.

    We have a handful of nice features to improve memory safety and correctness. A set of traits makes it easy to attach owned data to GObjects (ensuring data remains valid and is properly dropped when the GObject is destroyed), and a few macros set up the glue code between GTK signals and our data binding types.

    Windows (Win32)

    The Windows implementation may have been the most difficult to write, since Win32 GUIs are very rarely written nowadays and the API shows its age. We use the windows-sys crate to access bindings to the API (which was already vendored in the codebase for many other Windows API uses). This crate is generated directly from Windows function metadata (by Microsoft), but otherwise its bindings aren’t terribly different from what bindgen might have produced (though they are likely a bit more accurate).

    There were a number of hurdles to overcome. For one thing, the Win32 API doesn’t provide any layout primitives, so the high-level layout concepts we use (which allow graceful resize/repositioning) had to be implemented manually. There’s also quite a few extra API calls just to get to a GUI that looks somewhat decent (correct window colors, font smoothing, high DPI handling, etc). Even the default font ends up being a terrible looking bitmapped font rather than the more modern system default; we needed to manually retrieve the system default and set it as the font to use, which was a bit surprising!

    We have a set of traits to facilitate creating custom window classes and managing associated window data of class instances. We also have wrapper types to properly manage the lifetimes of handles and perform type conversions (mainly String to null-terminated wide strings and back) as an extra layer of safety around the API.

    macOS (Cocoa/AppKit)

    The macOS implementation had its tricky parts, as overwhelmingly macOS GUIs are written with XCode and there’s a lot of automated and generated portions (such as nibs). We again use bindgen to generate Rust bindings, this time for the Objective-C APIs in macOS framework headers.

    Unlike Windows and GTK, you don’t get keyboard shortcuts like Cmd-C, Cmd-Q, etc, for free if creating a GUI without e.g. XCode (which generates it for you as part of a new project template). To have these typical shortcuts that users expect, we needed to manually implement the application main menu (which is what governs keyboard shortcuts). We also had to handle runtime setup like creating Objective-C autorelease pools, bringing the window and application (which are separate concepts) to the foreground, etc. Even implementing invoke to call a function on the main thread had its nuances, since modal windows use a nested event loop which would not call queued functions under the default NSRunLoop mode.

    We wrote some simple helper types and a macro to make it easy to implement, register, and create Objective-C classes from Rust code. We used this for creating delegate classes as well as subclassing some controls for the implementation (like NSButton); it made it easy to safely manage the memory of Rust values underlying the classes and correctly register class method selectors.

    The Test UI

    We’ll discuss testing in the next section. Our testing UI is very simple. It doesn’t create a GUI, but allows us to interact directly with the model. The ui! macro supports an extra piece of syntax when tests are enabled to optionally set a string identifier for each element. We use these strings in unit tests to access and interact with the UI. The data binding types also support a few additional methods in tests to easily manipulate values. This UI allows us to simulate button presses, field entry, etc, to ensure that other UI state changes as expected as well as simulating the system side effects.

    Mocking and Testing

    An important goal of our rewrite was to add tests to the crash reporter; our old code was sorely lacking them (in part because unit testing GUIs is notoriously difficult).

    Mocking Everything

    In the new code, we can mock the crash reporter regardless of whether we are running tests or not (though it is always mocked for tests). This is important because mocking allows us to (manually) run the GUI in various states to check that the GUI implementations are correct and render well. Our mocking not only mocks the inputs to the crash reporter (environment variables, command line parameters, etc), it also mocks all side-effectful std functions.

    We accomplish this by having a std module in the crate, and using crate::std throughout the rest of the code. When mocking is disabled, crate::std is simply the same as ::std. But when it is enabled, a bunch of functions that we have written are used instead. These mock the filesystem, environment, launching external commands, and other side effects. Importantly, only the minimal amount to mock the existing functions is implemented, so that if e.g. some new functions from std::fs, std::net, etc. are used, the crate will fail to compile with mocking enabled (so that we don’t miss any side effects). This might sound like a lot of effort, but you might be surprised at how little of std really needed to be mocked, and most implementations were pretty straightforward.

    Now that we have our code using different mocked functions, we need to have a way of injecting the desired mock data (both in tests and in our normal mocked operation). For example, we have the ability to return some data when a File is read, but we need to be able to set that data differently for tests. Without going into too much detail, we accomplish this using a thread-local store of mock data. This way, we don’t need to change any code to accommodate the mock data; we only need to make changes where we set and retrieve it. The programming language enthusiasts out there may recognize this as a form of dynamic scoping. The implementation allows our mock data to be set with code like

    mock::builder()
        .set(
            crate::std::env::MockCurrentExe,
            "work_dir/crashreporter".into(),
        )
        .run(|| crash_reporter_main())
    

    in tests, and

    pub fn current_exe() -> std::io::Result {
        Ok(MockCurrentExe.get(|r| r.clone()))
    }
    

    in our crate::std::env implementation.

    Testing

    With our mocking setup and test UI, we are able to extensively test the behavior of the crash reporter. The “last mile” of this testing which we can’t automate easily is whether each UI implementation faithfully represents the UI model. We manually test this with a mocked GUI for each platform.

    Besides that, we are able to automatically test how arbitrary UI interactions cause the crash reporter to affect its own UI state and the environment (checking which programs are invoked and network connections are made, what happens if they fail, succeed, or timeout, etc). We also set up a mock filesystem and add assertions in various scenarios over the precise resulting filesystem state once the crash reporter completes. This greatly increases our confidence in the current behaviors and ensures that future changes will not alter them, which is of the utmost importance for such an essential component of our crash reporting pipeline.

    The End Product

    Of course we can’t get away with writing all of this without a picture of the crash reporter! This is what it looks like on Linux using GTK. The other GUI implementations look the same but styled with a native look and feel.

    The crash reporter dialog on Linux.

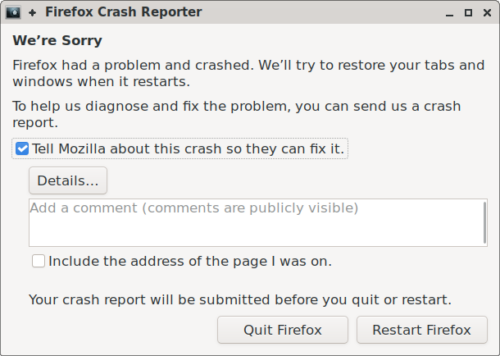
    Note that, for now, we wanted to keep it looking exactly the same as it previously did. So if you are unfortunate enough to see it, it shouldn’t appear as if anything has changed!

    With a new, cleaned up crash reporter, we can finally unblock a number of feature requests and bug reports, such as:

    • detecting whether an installation is corrupt and telling the user to re-install Firefox,
    • checking whether there is faulty memory hardware on the crashing system, and
    • using the Firefox network stack for the first attempt at submitting crashes (which respects user network settings like proxies).

    We are excited to iterate and improve further on crash reporter functionality. But ultimately it’d be wonderful if you never see or use it, and we are constantly working toward that goal!

    The post Porting a cross-platform GUI application to Rust appeared first on Mozilla Hacks - the Web developer blog.

  • Mozilla Hacks hacks.mozilla.org browser mozilla standards technology web-dev web-development 2024-04-11 15:13
    ↗

    In the fast-paced world of generative AI, staying ahead means moving swiftly and smartly. That's why we've embraced Gradio, the low-code prototyping toolkit from Hugging Face, as our go-to for bringing new ideas to life. The post Prototype even faster with the Gradio UI for...

    As an industry, generative AI is moving quickly, and so requires teams exploring new ideas and technologies to move quickly as well. To do so, we have been using Gradio, a low-code prototyping toolkit from Hugging Face, to spin up experiments and experiences. Gradio has allowed us to validate concepts through prototyping without large investments of time, effort, or infrastructure.

    Although Gradio has made the development phase of prototyping easier, the design phase has been largely the same. Even with Gradio, designers have had to create components in Figma, outline expected user flows and behaviors, and hand off designs for developers in the same way they have always done. While working on a recent exploration, we realized something was needed: a set of Figma components based on Gradio that enabled designers to create wireframes quickly.

    Today, we are releasing our library of design components for Gradio for others to use. The components are based on version 4.23.0 of Gradio and will be available through our Figma profile: Mozilla Innovation Projects, https://www.figma.com/@futureatmozilla. We hope these components help teams accelerate their discovery and experimentation with ML and generative AI.

    You can find out more about Gradio at https://www.gradio.app/ and more about innovation at Mozilla at https://future.mozilla.org

    Thanks to Amy Chiu and Anais Ron who created the components and to the Gradio team for their work. Happy designing!

    What’s Inside Gradio UI for Figma?

    Because Gradio is an ever-changing prototyping kit, current components are based on version 4.23.0 of Gradio. We selected components based on their wide array of potential uses. Here is a list of the components inside the kit:

    • Typography (e.g. headers, body fonts)
    • Iconography (e.g. chevrons, arrows, corner expanders) 

    Small Components:

    • Buttons
    • Checkbox
    • Radio
    • Sliders
    • Tabs
    • Accordion
    • Delete Button
    • Error Message
    • Media Type Labels
    • Media Player Controller

    Big Components:

    • Label + Textbox
    • Accordion with Label + Input
    • Video Player
    • Label + Counter
    • Label + Slider
    • Accordion + Label
    • Checkbox with Label
    • Radio with Label
    • Accordion with Content
    • Accordion with Label + Input
    • Top navigation

    How to Access and Use Gradio UI for Figma

    To start using the library, follow these simple steps:

    1. Access the Library: Access the component library directly by visiting our public Figma profile (https://www.figma.com/@futureatmozilla) or by searching for “Gradio UI for Figma” within the Figma Community section of your web or desktop Figma application.
    2. Explore the Documentation: Familiarize yourself with the components and guidelines to make the most out of your design process.
    3. Connect with Us: Connect with us by following our Figma profile or emailing us at innovations@mozilla.com

    The post Prototype even faster with the Gradio UI for Figma component library appeared first on Mozilla Hacks - the Web developer blog.

  • End of feed
Maibook — your private personalized AI community
  • rcanand.com
  • mlaillc.com
  • @rcanand (X)
  • LinkedIn
  • Feedback
  • Credits