https://www.youtube.com/@romahaecki Would you like to learn how to draw cute and playful characters but don’t know where to start? Struggling with proportions, poses, or composition? Not sure about color theory or how to pick the right colors? My Procreate character drawing...
https://www.youtube.com/@romahaecki
Would you like to learn how to draw cute and playful characters but don’t know where to start? Struggling with proportions, poses, or composition? Not sure about color theory or how to pick the right colors?
My Procreate character drawing tutorials are just for you!
In each tutorial you’ll get a free drawing guide, brushes, and a color palette to follow along. I’ll guide you step by step and share helpful tips and tricks, secret techniques and Procreate features I use all the time.
Subscribe to Draw with Haecki and create cute illustrations with my step-by-step tutorials!
❤❤❤
In this tutorial I will show you how to begin with the thumbnails, move on with the clean sketch, add color and texture to illustration and then how to animate your character in After Effects. We'll start by finding the best solution for the composition, and I'll share with...
In this tutorial I will show you how to begin with the thumbnails, move on with the clean sketch, add color and texture to illustration and then how to animate your character in After Effects.
We'll start by finding the best solution for the composition, and I'll share with you my methods of adding and adjusting textures that always make an illustration appealing to the eye.
You'll learn a lot from my approach in After Effects: I'll show you how to plan animations and animate eyes and fingers in an advanced way.
This will give you the knowledge of how to make your own animation much more interesting to the audience.
Beginners should watch this video to get an idea of what the whole animation creation process looks like, and experienced illustrators will learn many ways to use simple techniques to create complex animations and illustrations.
I hope this video will be your guide to a world of colorful and detailed illustrations and simple but eye-catching animations.
Use this tutorial to create you next artwork!
► YOU CAN SUPPORT ME ON PATREON and get sketch, colors, image reference, textures and brushes.
https://www.patreon.com/tt_tutorials
► VIDEO GUIDE:
0:00 Intro
00:16 drawing rough thumbnails and a clean sketch
01:03 tracing main shapes of illustration in Illustrator
01:26 how to quickly apply color in Photoshop
01:56 how to apply textures
03:00 preparing illustration for animation
03:15 creating an animation in After Effects
► FOLLOW ME:
Instagram: https://www.instagram.com/tt__tutorials/
Facebook: https://www.facebook.com/tt.tutorials.youtube
Behance: https://www.behance.net/tt_tutorials
Twitter: https://twitter.com/tt_tutorials
Music:
Wheels by Audionautix is licensed under a Creative Commons Attribution 4.0 license.
https://creativecommons.org/licenses/by/4.0/
Artist: http://audionautix.com/
Sunday Spirit by Audionautix is licensed under a Creative Commons Attribution 4.0 license.
https://creativecommons.org/licenses/by/4.0/
Artist: http://audionautix.com/
Santo Rico by Twin Musicom is licensed under a Creative Commons Attribution 4.0 license.
https://creativecommons.org/licenses/by/4.0/
Artist: http://www.twinmusicom.org/
Thank you for watching and see you in the next video!
#characterillustration #characteranimation #tt_tutorials
In this tutorial I will share with you my process of creating illustration from sketch in Photoshop and Illustrator and making an animation in After Effects. You will see how to organize your illustrating process from the very first ideas of what you'd like to implement in...
In this tutorial I will share with you my process of creating illustration from sketch in Photoshop and Illustrator and making an animation in After Effects.
You will see how to organize your illustrating process from the very first ideas of what you'd like to implement in your illustration. I'll show you how to push your idea by drawing the rough sketches until you understand what works for you the best in terms of composition and storytelling.
Then we'll move on with the unusual way of rendering an illustration: we trace all main shapes in Adobe Illustrator in b/w to save time and then export file to Photoshop, where you'll learn how to apply color on a fly. Literally seconds.
After this I will give you insights on how I apply textures to my illustrations. You will learn how to use Photoshop features to control tone, color and intensity of your textures.
All this recommendations will allow you to level up your illustrating skills, so I definitely recommend you to try out everything you'll see in this lesson.
The last chapter in this tutorial is animation in After Effects. It's not an easy one, but it will give you an overall picture of how you should prepare your illustration if you want to animate it, how to organize your workflow in After Effects to maintain control on your actions and how to animate each little part of an illustration until you get the final result.
People who will see After Effects workflow for the first time will get an understanding of how you bring still layers to life one by one, how layers start to interact and correspond to each other while the animation becomes more and more complicated. It might be overwhelming for newbies, but it is necessary to know what you are capable to do if you will practice animation. I find this tutorial motivating for anyone who wants to create animations.
For those who are not new to After Effects it will be extremely helpful to see my approach in animating this scene: you'll be able to use the finger, eye and flight animating tips in your own works, applying Alpha mattes and precomposed animations, which will give you more freedom to experiment and try out your own combinations.
Hope you'll have a lot of fun watching this one and find yourself motivated and ready to create your own animated illustrations!
► YOU CAN SUPPORT ME ON PATREON and get sketch, colors, image reference, textures and brushes.
https://www.patreon.com/tt_tutorials
► VIDEO GUIDE:
0:00 Intro
00:17 drawing rough thumbnails and a clean sketch
01:41 tracing main shapes of illustration in Illustrator
02:17 planning your future steps in illustration
02:56 open file in Photoshop. How to quickly apply color
03:15 how to apply textures
04:48 preparing illustration for animation
06:39 After Effects animating workflow
► FOLLOW ME:
Instagram: https://www.instagram.com/tt__tutorials/
Facebook: https://www.facebook.com/tt.tutorials.youtube
Behance: https://www.behance.net/tt_tutorials
Twitter: https://twitter.com/tt_tutorials
Music:
Carefree Melody by Twin Musicom is licensed under a Creative Commons Attribution 4.0 license.
https://creativecommons.org/licenses/by/4.0/
Source: http://www.twinmusicom.org/song/302/carefree-melody
Artist: http://www.twinmusicom.org
Bounce Ball by Twin Musicom is licensed under a Creative Commons Attribution 4.0 license.
https://creativecommons.org/licenses/by/4.0/
Source: http://www.twinmusicom.org/song/255/bounce-ball
Artist: http://www.twinmusicom.org
Italian Morning by Twin Musicom is licensed under a Creative Commons Attribution 4.0 license.
https://creativecommons.org/licenses/by/4.0/
Artist: http://www.twinmusicom.org/
Thank you for watching and see you in the next video!
#characterillustration #characteranimation #tt_tutorials
In today's tutorial you'll learn an easy way to model hands in Blender. I'll show you how to start with a single cube, modify it and sculpt in the late workflow (no tablet required). ► DOWNLOAD colors and finished 3d model hand from this tutorial, which you can open in...
In today's tutorial you'll learn an easy way to model hands in Blender.
I'll show you how to start with a single cube, modify it and sculpt in the late workflow (no tablet required).
► DOWNLOAD colors and finished 3d model hand from this tutorial, which you can open in Blender and practice in navigation, editing and building rendering scene.
https://www.patreon.com/tt_tutorials
I hope today’s tutorial about hand modeling in Blender will really help you out. Drop a comment below and let me know what you liked about this video!
► SUBSCRIBE to get more new tutorials!
https://www.youtube.com/TTTutorials?sub_confirmation=1
► FOLLOW ME:
Instagram: https://www.instagram.com/tt__tutorials/
Facebook: https://www.facebook.com/tt.tutorials.youtube
Behance: https://www.behance.net/tt_tutorials
Twitter: https://twitter.com/tt_tutorials
Thank you for watching!
#Blender #howtomodelhands#handmodeling #tt_tutorials
In today's tutorial I'll show you all fundamental features and techniques to model characters in Blender. You'll learn how to model head and face, how to apply basic material and colors, how to set up light and camera, how to render a turntable animation using timesaving...
In today's tutorial I'll show you all fundamental features and techniques to model characters in Blender. You'll learn how to model head and face, how to apply basic material and colors, how to set up light and camera, how to render a turntable animation using timesaving render settings and much, much more.
► DOWNLOAD colors and finished 3d model from tutorial, which you can open in Blender and practice in navigation, editing and building rendering scene.
https://www.patreon.com/tt_tutorials
► VIDEO GUIDE:
0:00 Intro
00:11 - how to model a head
01:43 - how to model ears
03:29 - how to model eyes
04:24 - how to model a nose
05:20 - how to model cheeks
06:31 - how to create lips
08:17 - how to make eyebrows
10:15 - how to make a beard and hair
11:33 - how to connect 2 edges
12:47 - how to use loop cut
13:03 - how to solidify hair
13:55 - how to apply colors
14:36 - how add a light source and camera
15:09 - how to change material's roughness
15:25 - how to set up lights
15:45 - how to make a turntable animation
I hope today’s tutorial about character modeling in Blender will really help you out. Drop a comment below and let me know what you liked about this video!
► SUBSCRIBE to get more new tutorials!
https://www.youtube.com/TTTutorials?sub_confirmation=1
► FOLLOW ME:
Instagram: https://www.instagram.com/tt__tutorials/
Facebook: https://www.facebook.com/tt.tutorials.youtube
Behance: https://www.behance.net/tt_tutorials
Twitter: https://twitter.com/tt_tutorials
Thank you for watching!
#Blender #charactermodeling #tt_tutorials
In today's Adobe Illustrator tutorial you'll learn the easiest way to draw poses for your flat character illustration and will see the full character design process from sketch to final render in Adobe Illustrator. You'll see how to create a template model in Adobe...
In today's Adobe Illustrator tutorial you'll learn the easiest way to draw poses for your flat character illustration and will see the full character design process from sketch to final render in Adobe Illustrator. You'll see how to create a template model in Adobe Illustrator and use it to adjust poses for all your flat style character illustrations. Then I'll show you how to draw sketch and use basic Illustrator tools and features to quickly get the final character design. This Illustrator tutorial is for beginners.
I hope today’s illustration tutorial about flat character design in Illustrator will really help you out. Drop a comment below and let me know what you liked about this video!
► VIDEO GUIDE:
0:00 Intro
00:14 how to create a model for posing
00:55 how to apply poses to a model
02:09 how to draw sketch
03:42 how to trace sketch
08:50 how to apply colors
► DOWNLOAD my sketch, color palette, image reference, pose reference, training model .ai file and practice all that you've seen in this video!
https://www.patreon.com/tt_tutorials
► SUBSCRIBE to get more new tutorials!
https://www.youtube.com/TTTutorials?sub_confirmation=1
► FOLLOW ME:
Instagram: https://www.instagram.com/tt__tutorials/
Facebook: https://www.facebook.com/tt.tutorials.youtube
Behance: https://www.behance.net/tt_tutorials
Twitter: https://twitter.com/tt_tutorials
► MORE CHARACTER ILLUSTRATIONS TUTORIALS:
https://www.youtube.com/playlist?list=PLIhDo8zfb4iowU3mBbmja_P2HYwY5l9EC
Thank you for watching!
#flatdesign #character #illustrator #tt_tutorials
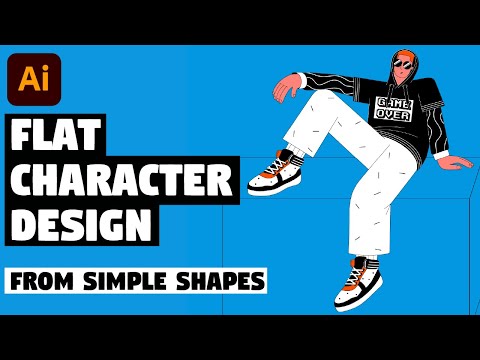
In today's Illustrator tutorial you'll learn how to draw flat character design from simple shapes, how to quickly trace your character illustrations and how to apply colors. After this Illustrator tutorial you'll understand how to easily change the pose of your character and...
In today's Illustrator tutorial you'll learn how to draw flat character design from simple shapes, how to quickly trace your character illustrations and how to apply colors. After this Illustrator tutorial you'll understand how to easily change the pose of your character and will be confident in your illustrating workflow.
I hope today’s illustration tutorial about flat character design in Illustrator will really help you out. Drop a comment below and let me know what you liked about this video!
► VIDEO GUIDE:
0:00 Intro
00:12 how to apply pose using rectangles
01:08 how to draw sketch
01:27 how to trace sketch
03:10 how to apply colors
► DOWNLOAD my sketch, color palette, image reference and practice all that you've seen in this video!
https://www.patreon.com/tt_tutorials
► SUBSCRIBE to get more new tutorials!
https://www.youtube.com/TTTutorials?sub_confirmation=1
► FOLLOW ME:
Instagram: https://www.instagram.com/tt__tutorials/
Facebook: https://www.facebook.com/tt.tutorials.youtube
Behance: https://www.behance.net/tt_tutorials
Twitter: https://twitter.com/tt_tutorials
► MORE CHARACTER ILLUSTRATIONS TUTORIALS:
https://www.youtube.com/playlist?list=PLIhDo8zfb4iowU3mBbmja_P2HYwY5l9EC
Thank you for watching!
#flatdesign #character #illustrator #tt_tutorials
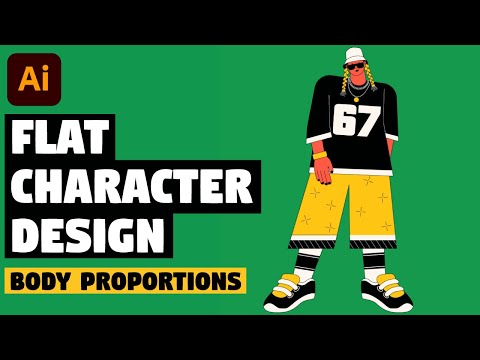
In today's Illustrator tutorial you'll learn how to quickly draw character's proportions without any measurements and how to trace and color your flat character illustration in Adobe Illustrator even if you're a beginner. I'll show you how to use crucial points from standard...
In today's Illustrator tutorial you'll learn how to quickly draw character's proportions without any measurements and how to trace and color your flat character illustration in Adobe Illustrator even if you're a beginner.
I'll show you how to use crucial points from standard human proportions to create any flat design character on a fly.
I hope today’s illustration tutorial about flat character design in Illustrator will really help you out. Drop a comment below and let me know what you liked about this video!
► VIDEO GUIDE:
0:00 Intro
0:15 how to draw stylized character proportions
02:03 how to trace your flat character
► DOWNLOAD my sketch, color palette, image reference and practice all that you've seen in this video!
https://www.patreon.com/tt_tutorials
► SUBSCRIBE to get more new tutorials!
https://www.youtube.com/TTTutorials?sub_confirmation=1
► FOLLOW ME:
Instagram: https://www.instagram.com/tt__tutorials/
Facebook: https://www.facebook.com/tt.tutorials.youtube
Behance: https://www.behance.net/tt_tutorials
Twitter: https://twitter.com/tt_tutorials
► MORE CHARACTER ILLUSTRATIONS TUTORIALS:
https://www.youtube.com/playlist?list=PLIhDo8zfb4iowU3mBbmja_P2HYwY5l9EC
Thank you for watching!
#flatdesign #character #illustrator #tt_tutorials
In today's Illustrator tutorial you'll learn how to create your own flat character design in Adobe Illustrator from photo reference. I will show you how to draw sketch step by step and how to use the Pen tool and Pathfinder to render character illustration even if you're a...
In today's Illustrator tutorial you'll learn how to create your own flat character design in Adobe Illustrator from photo reference.
I will show you how to draw sketch step by step and how to use the Pen tool and Pathfinder to render character illustration even if you're a beginner.
I hope today’s illustration tutorial about flat character design in Illustrator will really help you out. Drop a comment below and let me know what you liked about this video!
► VIDEO GUIDE:
0:00 Intro
0:19 how to draw sketch from reference
01:18 how to use Outline-Divide method for tracing
02:48 how to use Clipping mask
► DOWNLOAD my sketch, color palette, image reference and practice all that you've seen in this video!
https://www.patreon.com/tt_tutorials
► SUBSCRIBE to get more new tutorials!
https://www.youtube.com/TTTutorials?sub_confirmation=1
► FOLLOW ME:
Instagram: https://www.instagram.com/tt__tutorials/
Facebook: https://www.facebook.com/tt.tutorials.youtube
Behance: https://www.behance.net/tt_tutorials
Twitter: https://twitter.com/tt_tutorials
► MORE CHARACTER ILLUSTRATIONS TUTORIALS:
https://www.youtube.com/playlist?list=PLIhDo8zfb4iowU3mBbmja_P2HYwY5l9EC
Thank you for watching!
#flatdesign #character #illustrator #tt_tutorials
In today's Illustration tutorial you'll learn advanced ways of how to add texture in Photoshop and how to use advanced features to customize even standard noise textures. I'll show you how to create a custom texture brush, how to adjust it to add texture to your character...
In today's Illustration tutorial you'll learn advanced ways of how to add texture in Photoshop and how to use advanced features to customize even standard noise textures.
I'll show you how to create a custom texture brush, how to adjust it to add texture to your character illustration fast and easy, how to use advanced Photoshop features to add noise texture with different settings and appearance and will share a special photo texturing method that few illustrators know about.
You'll be able to use tips from this Photoshop tutorial even if you're a beginner and will make your own illustrations much better.
I hope today’s illustration tutorial about texture in Photoshop will really help you out. Drop a comment below and let me know what you liked about this video!
► VIDEO GUIDE:
0:00 Intro
0:25 how to create a custom texture brush and how to adjust it
01:59 how to make a 'see through' texture
02:17 how to make a hard edge for texture
02:33 how to make a soft edge for texture
02:50 how to add noise texture (from basic to advanced)
03:28 how to use Dissolve to add noise shadows and highlights
03:49 special advanced texturing method to add photo textures
► DOWNLOAD my sketch, color palette, image reference and practice all that you've seen in this video!
https://www.patreon.com/tt_tutorials
► SUBSCRIBE to get more new tutorials!
https://www.youtube.com/TTTutorials?sub_confirmation=1
► FOLLOW ME:
Instagram: https://www.instagram.com/tt__tutorials/
Facebook: https://www.facebook.com/tt.tutorials.youtube
Behance: https://www.behance.net/tt_tutorials
Twitter: https://twitter.com/tt_tutorials
► MORE CHARACTER ILLUSTRATIONS TUTORIALS:
https://www.youtube.com/playlist?list=PLIhDo8zfb4iowU3mBbmja_P2HYwY5l9EC
Thank you for watching!
#texture #photoshop #illustration #tt_tutorials
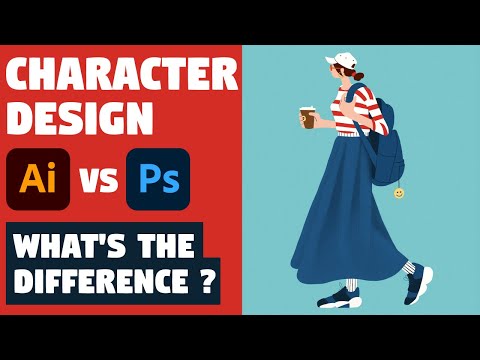
In today's tutorial you'll see the difference between Illustrator and Photoshop in character design and will understand which one you should choose to create your own character Illustrations. I hope today’s illustration tutorial about difference in Illustrator and Photoshop...
In today's tutorial you'll see the difference between Illustrator and Photoshop in character design and will understand which one you should choose to create your own character Illustrations.
I hope today’s illustration tutorial about difference in Illustrator and Photoshop will really help you out. Drop a comment below and let me know what you liked about this video!
► DOWNLOAD my sketch, color palette, image reference and practice all that you've seen in this video!
https://www.patreon.com/tt_tutorials
► SUBSCRIBE to get more new tutorials!
https://www.youtube.com/TTTutorials?sub_confirmation=1
► FOLLOW ME:
Instagram: https://www.instagram.com/tt__tutorials/
Facebook: https://www.facebook.com/tt.tutorials.youtube
Behance: https://www.behance.net/tt_tutorials
Pinterest: https://www.pinterest.com/tt_tutorials/
Twitter: https://twitter.com/tt_tutorials
► MORE CHARACTER ILLUSTRATIONS TUTORIALS:
https://www.youtube.com/playlist?list=PLIhDo8zfb4iowU3mBbmja_P2HYwY5l9EC
Thank you for watching!
#characterillustration #illustrator #photoshop #tt_tutorials
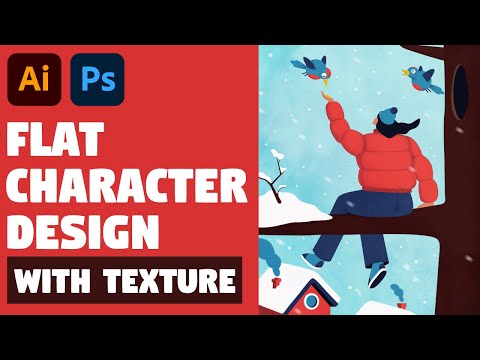
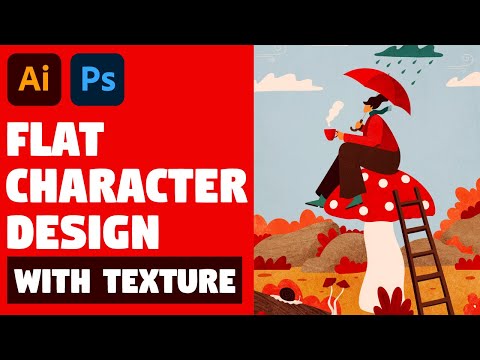
In today's Adobe Photoshop and Illustrator tutorial you'll learn how to create character illustration with texture. You'll learn how to create texture brushes and add eye catching details to flat character design, how to apply photo textures to flat character and how to...
In today's Adobe Photoshop and Illustrator tutorial you'll learn how to create character illustration with texture. You'll learn how to create texture brushes and add eye catching details to flat character design, how to apply photo textures to flat character and how to through all the stages from sketch to finished flat style character illustration with texture in Photoshop.
I hope today’s illustration tutorial about flat character design in Illustrator and Photoshop will really help you out. Drop a comment below and let me know what you liked about this video!
► VIDEO GUIDE:
0:00 Intro
0:23 how to draw sketch
01:00 how to trace sketch in Illustrator
02:24 how to export vector to Photoshop with layers
03:07 how to create a photo texture brush
05:12 how to use a photo texture brush
05:27 how to create a stipple (scatter) brush
05:46 how to use a stipple (scatter) brush
06:08 how to add noise
06:21 how to apply photo texture
06:58 how to add depth with lens blur
07:21 how to add motion to snow
07:35 workflow overview
► DOWNLOAD my sketch, color palette, image reference, 3 textures and practice all that you've seen in this video!
https://www.patreon.com/tt_tutorials
► SUBSCRIBE to get more new tutorials!
https://www.youtube.com/TTTutorials?sub_confirmation=1
► FOLLOW ME:
Instagram: https://www.instagram.com/tt__tutorials/
Facebook: https://www.facebook.com/tt.tutorials.youtube
Behance: https://www.behance.net/tt_tutorials
Pinterest: https://www.pinterest.com/tt_tutorials/
Twitter: https://twitter.com/tt_tutorials
► MORE CHARACTER ILLUSTRATIONS TUTORIALS:
https://www.youtube.com/playlist?list=PLIhDo8zfb4iowU3mBbmja_P2HYwY5l9EC
Thank you for watching!
#characterillustration #illustrator #tt_tutorials
In today's Adobe Photoshop and Illustrator tutorial you'll learn how to create character illustration with texture. This time you will see how to apply photo textures to flat character design and will understand why it's better to trace flat character in Illustrator and then...
In today's Adobe Photoshop and Illustrator tutorial you'll learn how to create character illustration with texture. This time you will see how to apply photo textures to flat character design and will understand why it's better to trace flat character in Illustrator and then export vector to raster to add texture in Photoshop. I will show you full character design process starting from pencil sketch to finished character illustration with texture, so you will understand each step even if you're a beginner.
I hope today’s illustration tutorial about flat character design in Illustrator and Photoshop will really help you out. Drop a comment below and let me know what you liked about this video!
► VIDEO GUIDE:
0:00 Intro
0:25 how to draw sketch
01:41 how to trace pencil sketch with the Pen Tool, Blob Brush and Shape Builder Tool
03:27 how to adjust your photo to use it as a color reference
04:17 how to pick colors from photo to color illustration
04:46 how to export Illustrator file to Photoshop and keep all layers
05:40 how to add photo textures in Photoshop
07:53 why use Photoshop for textures instead of Illustrator
► DOWNLOAD my sketch, color palette, image reference, 5 textures, mushroom photo from video (edited and unedited) and practice all that you've seen in this video!
https://www.patreon.com/tt_tutorials
► SUBSCRIBE to get more new tutorials!
https://www.youtube.com/TTTutorials?sub_confirmation=1
► FOLLOW ME:
Instagram: https://www.instagram.com/tt__tutorials/
Facebook: https://www.facebook.com/tt.tutorials.youtube
Behance: https://www.behance.net/tt_tutorials
Pinterest: https://www.pinterest.com/tt_tutorials/
Twitter: https://twitter.com/tt_tutorials
► MORE CHARACTER ILLUSTRATIONS TUTORIALS:
https://www.youtube.com/playlist?list=PLIhDo8zfb4iowU3mBbmja_P2HYwY5l9EC
Thank you for watching!
#characterillustration #illustrator #tt_tutorials
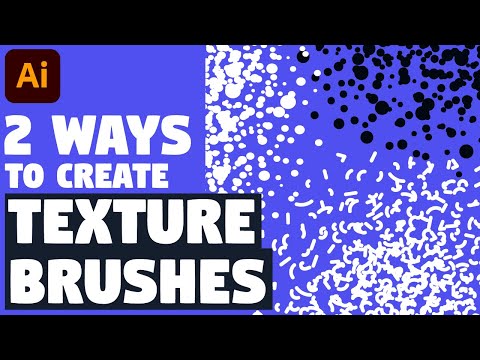
In today's Adobe Illustrator tutorial you'll learn 2 ways to create your own grain texture brush in Illustrator. Noise texture brush is tricky to use if you don't know needed hints, so in this Illustrator tutorial you'll find the best methods to create grain brush, save it...
In today's Adobe Illustrator tutorial you'll learn 2 ways to create your own grain texture brush in Illustrator.
Noise texture brush is tricky to use if you don't know needed hints, so in this Illustrator tutorial you'll find the best methods to create grain brush, save it (and add to Illustrator brushes), adjust settings for your custom brush and apply this grain texture brush to your illustration in 2 different ways. You will be able to easily use it with the Brush tool, Pen tool or Sprayer tool on your choice.
I hope today’s Illustrator tutorial about grain texture brushes will really help you out. Drop a comment below and let me know what you liked about this video!
► VIDEO GUIDE:
0:00 Intro
0:14 how to create a noise for your custom texture brush
0:38 how to add custom noise to the Brushes panel and how to adjust your noise brush
01:28 how to edit brush strokes with the Direct Selection tool + 'Simplify' feature and how to apply your custom noise to a single stroke made with the Pen tool
02:07 how to use the Symbol Sprayer tool; how to add your noise to the symbols panel, how to adjust spraying and how to control it
03:35 how to use the Soft Light Blending mode to skip manual noise coloring
04:04 how to apply texture brushes to the shapes in your illustrations
► SUBSCRIBE to get more new tutorials!
https://www.youtube.com/TTTutorials?sub_confirmation=1
► FOLLOW ME:
Instagram: https://www.instagram.com/tt__tutorials/
Facebook: https://www.facebook.com/tt.tutorials.youtube
Behance: https://www.behance.net/tt_tutorials
Pinterest: https://www.pinterest.com/tt_tutorials/
Twitter: https://twitter.com/tt_tutorials
► MORE ADOBE ILLUSTRATOR TUTORIALS:
https://www.youtube.com/playlist?list=PLIhDo8zfb4irZOMSWZGVTfgN0XRrpjOat
Thank you for watching!
#texturebrush #illustratortutorial #tt_tutorials
In today's Adobe Illustrator tutorial you'll learn 3 ways to add grain texture without any brushes and how to texture illustration easily with full control on each texture effect you make. Adobe Illustrator has many adjustments and options for those who want to add texture...
In today's Adobe Illustrator tutorial you'll learn 3 ways to add grain texture without any brushes and how to texture illustration easily with full control on each texture effect you make.
Adobe Illustrator has many adjustments and options for those who want to add texture (which may be confusing for beginners), so in this tutorial I will show you the best methods and approaches to add texture in Illustrator, which you'll be able to use even if you are going to add texture in Illustrator for the first time.
I hope today’s Illustrator tutorial about vector textures will really help you out. Drop a comment below and let me know what you liked about this video!
► VIDEO GUIDE:
0:00 Intro
0:12 1st way: add textures using opacity mask and linear gradient
01:23 2nd way: imitate a noise brush using opacity mask and freeform gradient
03:01 3d way: learn how to create multilayered textures with rim light, shadows and different settings to bring your illustrations to the next level
05:35 bonus tip on how to control texture resolution
► SUBSCRIBE to get more new tutorials!
https://www.youtube.com/TTTutorials?sub_confirmation=1
► FOLLOW ME:
Instagram: https://www.instagram.com/tt__tutorials/
Facebook: https://www.facebook.com/tt.tutorials.youtube
Behance: https://www.behance.net/tt_tutorials
Pinterest: https://www.pinterest.com/tt_tutorials/
Twitter: https://twitter.com/tt_tutorials
► MORE ADOBE ILLUSTRATOR TUTORIALS:
https://www.youtube.com/playlist?list=PLIhDo8zfb4irZOMSWZGVTfgN0XRrpjOat
Thank you for watching!
#textureillustrator #illustratortutorial #tt_tutorials